Pages

Showing posts with label knitting. Show all posts

Thursday, 21 February 2013

Stitch and Bitch - Starting a Craft Club


It has come to my attention that some of my recent craft projects aren't... well, really that Simple.  The initial technique of say, a simple cable knit, or needle-felting a rounded shape, is very easy.  But there is a big jump between making this jumper, which spells everything out for you:


 ...and this jumper, which I haven't bothered blogging about because I am myself finding the shaping and following the (translated from French) pattern very tricky and annoying.  This is probably my fault because I still can't be bothered to swatch properly.  O well.  Similarly, there is a difference between being able to felt an oval body and realising what you need to add to it to make it into a chubby fox as opposed to an owl.


So I have let this blog fall by the wayside a bit.  Sorry about that.  But!  I do have a Simple thing to Do which I can tell you about: setting up a craft club.
My mother attends knitting and crochet/other sessions with other ladies in her Colorado hometown known as 'Stitch and Bitch' - the idea being that you all get together in a very feminine, empowered setting and bloody well knit and gossip to your heart's content.  It's a great idea, and one I am experimenting with doing needle felting.
We're calling it Gin and Fluff, after our lubricant of choice and the large amount of merino which gets everywhere.  All you need is a felting needle each, a few large bathroom-cleaning sponges for mats (available very cheaply in supermarkets), and a bag of fluff or two.   So far I'm being paid in alcohol which gets brought to the session and providing the fluff myself - although an anonymous benefactor did send me some more needles the other day which means the next session can be expanded.  Thank you, lovely person!

Set Up A Craft Club
1)  Choose your craft - knitting works well for people to bring their own projects from home, especially to get help where they're stuck.  Ditto embroidery projects.  Fluff seems to work best in-house as then one person can keep an eye on the needles.
2) Decide on a groovy name!
3) Set up a mailing list on Facebook or email, letting people know when the next session will be (and who's hosting).
4) Acquire the necessary materials - sponge, fluff, needles, embroidery wool and needle, beads, gin, tonic, limes, crisps in our case.  Set up.
5) Decide whether you need to take a small amount of money off people.  I decided I didn't, as I would rather buy in fluff so that my mates would like to come over and fluff with me than spend money seeing them in a pub.  If your club includes wider acquaintances or initial strangers, you might want something to cover the materials at first.
6) Get crafting!  I provided a model and taught three mates to make a grumpy baby penguin or a wistful owl.  While we stabbed and bitched about our work days, I made some things which an absent friend had commissioned earlier - ring-tailed lemur, more complex owl, and a badger. 
7) Make sure to take feedback after the event - do people want to make more complex things, are they looking for inspiration, did people miss out and want to come to the next one?

This is why I hope I can keep the meetings going - I get to spend time on my hobby at home, and spend time with my mates, and they get to make stuff to take home and show off to their work mates, and all get together in an intimate bitching session to stab things - which is very therapeutic.
Look what we made!
Left to right: E badger, A owl, E owl, S 'turtle,' C penguin, E penguin, E lemur, K penguin

Wednesday, 19 December 2012

Aran Cardigan finished article


It's finished!  Here I am modelling my big fluffy item on my Dad's incredibly expensive Italian sofa, posing pretentiously.  I'm particularly pleased with the sleeves, as I'd got my cable-eights really sorted by then. 

Sadly the acrylic yarn I used is not bobble-resistant at all, but it doesn't seem to shed; its moth-resistance will have to be tested later in the year when it gets put away for the summer.

My next knitting commission will take me a good long time; a friend of mine wants a 'sexy cable-knit' which is 'yuppie-y, but not too much' and the pattern I have gives the required gague in cable-stitches, so I will have to swatch like mad.  If I have any crafting-budget left over after the holiday season, I can feel more needle-felting coming on.  It's high time I combined it with beads to make easy, Simple birthday presents to last the rest of 2013.


Saturday, 8 December 2012

Joining Ends Of Yarn With A Felting Needle


A very Simple quickie today - ever had this annoying situation?  You get to the end of a ball of wool, but you're still in the middle of working a piece?  There are lots of ways of joining the ends of a new ball into your work; my favoured method used to be the 'leave the dud end on the wrongside and pick up the new thread like nothing happened' method.  Then you knot the loose ends together and skim them in at the end.

This is inferior!  Now that I have my felting needle and mat, I can do this - all without getting up from my armchair:


Just stab until melded.  You'll have one or two fatso stitches on your rightside, but who likes skimming in ends?  Nobody.  Who likes stabbing fluffy things?   Ok, rhetorical....

Thursday, 22 November 2012

Aran Cardigan Progress


I've been raring through this pattern, after a few rookie errors with the left front the right front was easy.

Someone (who shall remain anonymous) slurred this blog recently by claiming that it is no longer quite devoted to 'simple' things.  I think they think that cable jumpers are complicated.  Allow me to disagree.  When I have finished this, I will show you these stitches, and you will see how amazingly simple knitting a jumper like this is compared to how it looks.  Admittedly, it does look pretty complicated and awesome.


Monday, 9 July 2012

Knitted Baby Jumper Pattern


I say pattern.  Really this jumper is an experiment and a mess and I have no idea if the proportions are correct for the average baby of whatever age.  I just wanted to make something nice for the boss' first grandchild, and a teeny jumper seemed like the way to go.  I would follow a pattern, but they all rely on specific gague and I utterly cannot be arsed to find the wool/needles to fit a gague when I have non-matching wool and needles waiting to be used.  So I made it up.
Use these patterns for the contrasting details.

I think modelled on the man's teddy it looks a bit like a biker jacket.  Hopefully on the real Baby Boss it will look just as cool but in a less odd way.  Colour was intentionally picked to be gender-neutral, as were the barbed spear/flower patterns on the borders and back.

Baby Jumper From Scratch
You Will Need: Needles 3.5mm, 2 colours of soft DK wool, at least 2 balls of your main colour; 3 small buttons, darning needle (with really large eye), scissors.

Back
Cast on 45 sts.
Row 1 purl.
Six rows of 5 knit 5 purl ribbing.
Knit in stocking stitch until 3 inches long.  Insert the large flower/toothy ethnic pattern in a sympathetic colour of the same kind of wool. Finish pattern and continue in plain stst until the whole thing is 7 inches long.


Round off with another six rows of 5 knit 5 purl ribbing.
Cast off.

Front - No Buttonholes
Cast on 25 sts.
Row 1 purl.
Six rows of 5 knit 5 purl ribbing.
3 rows of plain stocking stitch.
Follow the pattern below for the border in your contrasting colour.

Knit another 2 rows of stocking stitch.
Begin decrease rows: begin every knit row with a knit-2-together until you only have approximately 10 stitches.  Check for length against your back piece - the front should come up to the bottom of the ribbing.
Finish the front with 6 rows of 5 knit 5 purl ribbing.
Cast off.

Front - with Buttonholes

Cast on 25 sts.
Row 1 purl.
Two rows of knit 5 purl 5 ribbing.
Button row: knit 2, yarnover, knit two together, knit one, finish the ribbing as usual.
Three rows of ribbing.
Button row: stitch two stitches, yarnover, stitch two together, finish the row.
Two rows of stocking stitch.
Insert the pattern; in the third pattern row, add a further yarnover and decrease stitch two stitches in.
Just after the pattern, before you begin the decreases, add another yarnover and decrease stitch two stitches in.
Complete the decrease rows and ribbing to finish, with the two fronts the same length.
Cast off.

Sleeves x 2
Cast on 20 stitches.
5 rows of knit 1 purl 1 ribbing.
3 rows of stocking stitch.
Insert the pattern for the border.  In the sixth row of the border, increase 1 at both ends of the row.
*Knit five rows of stocking stitch, then increase the next row at each end.*  Continue this pattern until your sleeves are as long as the back is wide.

Assembly
Weave in any loose ends from the different colous on each piece, using the appropriate method for your needle.  Using as much of your cast-on and cast-off ends as possible, seam the long edges of the sleeves.  Join the top edge of each front to the back, and seam around the round edge of each sleeve.  Finish off by joining the back to the fronts, putting extra strong stitches in the armpits which go / \  - across the seams on every piece.  Sew on the buttons, using a thin strand untwisted from your main wool colour as thread so that the stitches are invisible and strong.  (I hadn't done the buttons when these photos were taken).  Do up the buttons and you're ready to hand it on!

Wednesday, 18 April 2012

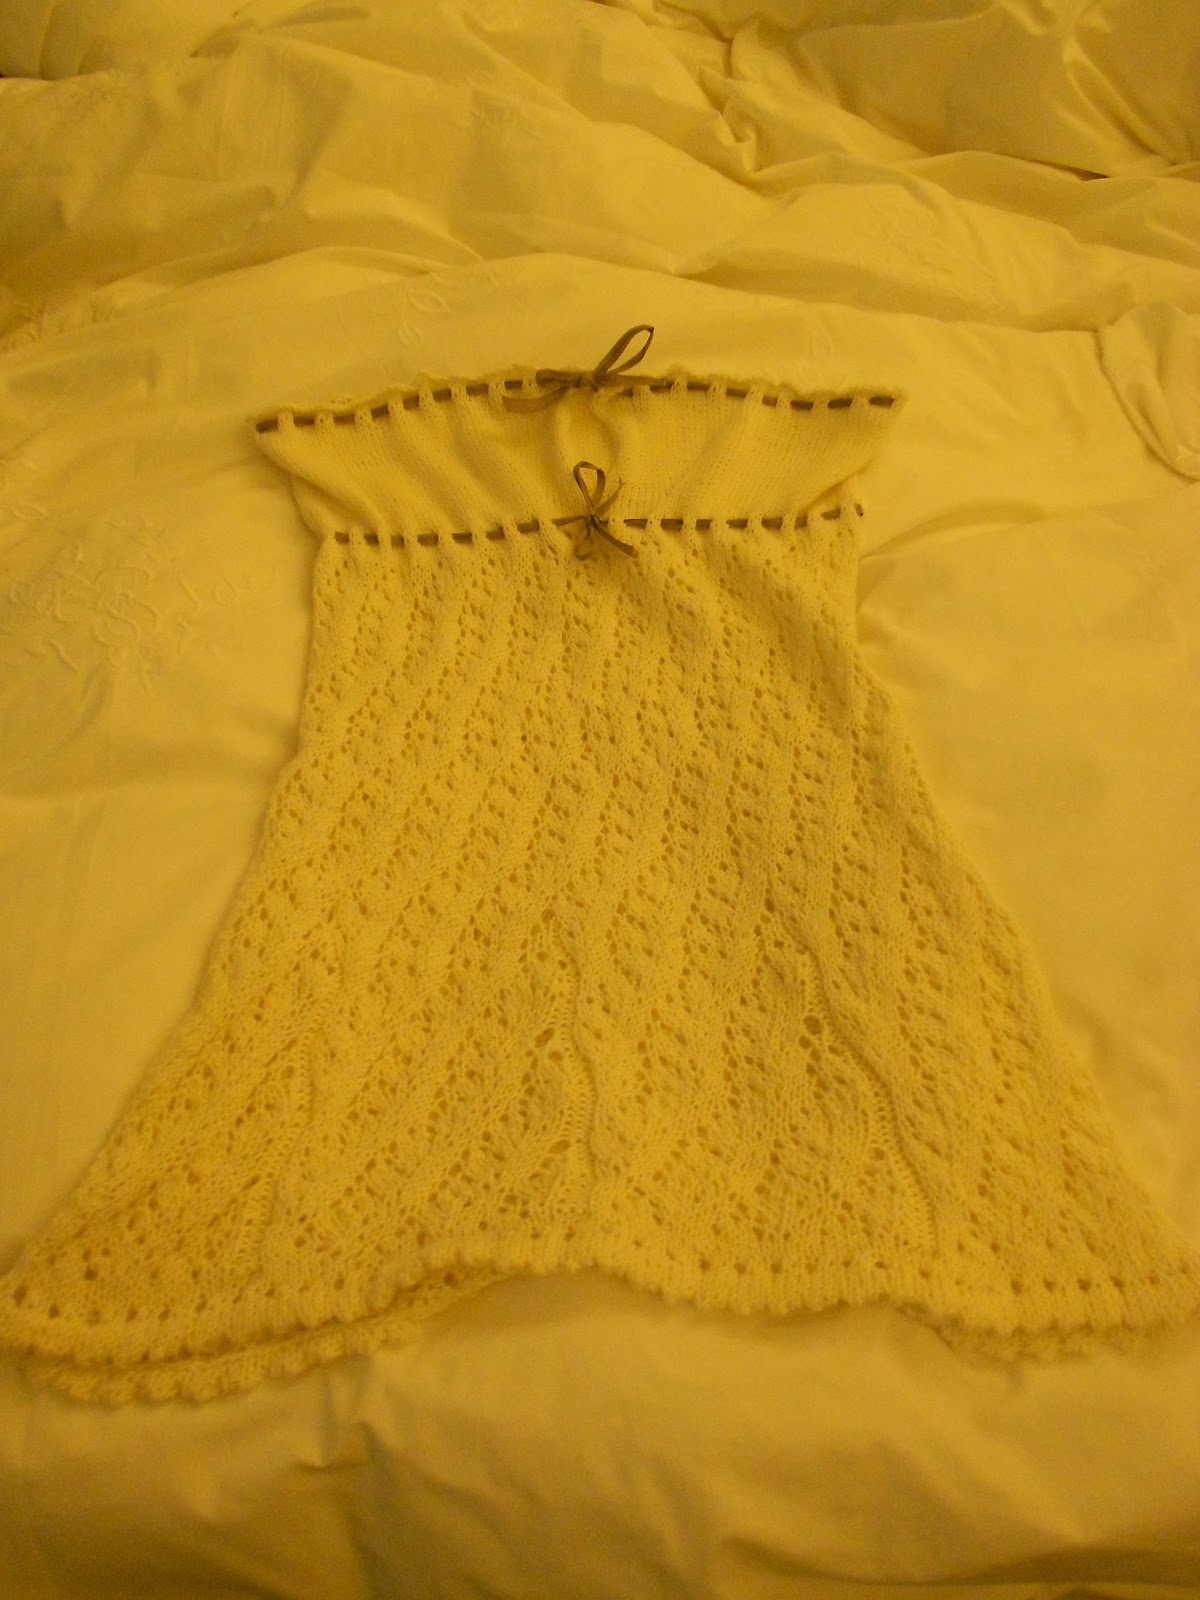
Knitting A Dress In The Round: FINISH HIM

The above title is an allusion to 90s beat-em-up button masher Mortal Kombat, in case you were wondering.

Once you have reached up to two-three inches of your desired final length, stop doing the lace repeats and work three rows of knit stitches, knitting over the purled decrease-triangles (they were only purled to keep them visually separate from the lace).  On your fouth row, do a picot row: *knit1, yarnover, knit2tog*; then do another six rows of knit stitches, followed by another picot row; followed by another two rows of knit stitches.  Now cast off


Turn the work wrong-side out, and fold up the hem along the lowest row of picot holes.  Slip-stitch the hem into place with the last of your wool.  Weave in any dangly ends you can see using the TechKnitting tips to help you (they are AMAZINGly good).

Try on your dress right-side-out before blocking, to see which directions it needs to stretch and be moulded.   Bear in mind that the lace will expand downwards a good way when blocked, outwards too.

N.B. the increase/decrease diamond has flattened out
Now hand-wash your dress in warm water with delicates-washing soap.  Don't bash it about too much as we don't want to obscure all the holes in the lace by felting the wool (which makes it fluffy).  When you're bored, pull the dress into a long thick rope top-to-bottom and squeeze the water out from the bodice to the hem.  This helps to lengthen it and straighten the lace stitches.  Lay a towel over a large chair or sofa, and using as many pins as it takes to hold it down, stretch and shape it so that the picot rows stand out at the upper edge and the increase section is nice and flared.  Leave to dry naturally.

Meanwhile, choose your ribbon.  I am lucky enough to live and work just round the corner from VVRouleaux, a boutique which specialises in designer trimmings, ribbon and frills.  Strikingly-coloured ribbons can be a surprisingly cheap or expensive way to tart up a craft creation, depending on how difficult it is to make the ribbons in the first place.  As my dress is an ivory white, I had to choose carefully to get the right level of subtle 'accent' colour.  The light in my workroom is awful but the ribbon is grey/lavender.

When your dress is dry, attach a safety-pin to one end of your ribbon, and using the blunt 'head' end weave approx. 1 metre of ribbon through all of the picot holes at the top edge and under the bust.  Start at the centre, work your way round and cut leaving plenty of length for loosening the tension and for a bow.  Trim the ends with the traditional triangle to discourage fraying, or carefully roll the ends back on themselves and secure with a few tiny stitches.


Done!

Saturday, 17 March 2012

Knitting a Dress in the Round - Main Lace Pattern


Diagonal Lace 2
Here's a link to the lace pattern which I have been using for the body of my dress.  I realised that I personally would go much faster if I used right-leaning decreases (k2tog) rather than left-leaning ones (ssk) so have actually turned the pattern inside out.  If you'd like to do this:

1) Read the pattern 'backwards,' right-to-left when it's written out.
2) Remember that in an instruction '(yo, k1) twice' you will still be reading right to left, so actually (k1, yo) twice.
3) Substitute right-leaners for left leaners, and vice versa.  This is much easier when there's only one kind of decrease in your pattern - e.g. I simply replace every instance of 'ssk' with 'k2tog'.

Here's a further link to the TECHKnitting post where I checked that this would work!  Scroll to the last comments.

Knitting Lace in the Round

It can be done - it just takes a little thought.
When reading your pattern,   if stitches are marked off for the beginning and end of rows - leave them out.  Just do the main lace repeat section for each row all the way round.  E.g. in my pattern, I do not knit 1 at the end and beginning of each row as described.

The lace pattern which I'm using uses multiples of 9 stitches: to create the pattern shown needs a minimum band of nine stitches wide and 36 rows long.  You must knit to get the correct measurement for you according to your gague - if your eventual under-bust stitch-count is not a multiple of 9, fear not.  Start each row with the lace repeat, and at the end of the row knit any stitches which won't fit.  Since the beginning and end of the row is at the back of the garment, this will leave a long strip of plain stockinette down the back which can be decorated with false-pearl buttons as a feature of the dress.

Knitting the Torso

After your decrease rows, do another 2 rows of plain knit stitches, then another picot row - *k1, yo, k2tog*.  Finish this feature with another two rows of plain knit stitches; as you go, remove all of your stitch counters except that which reminds you where the beginning of the round is.  

Measure your torso down to where your hips start to flare out, from your bustline to under your bellybutton.  Follow the lace pattern (plus knitting any odd stitches at the end) until you have the correct length. 

Next I will work out and blog how to flare the skirt gracefully, and choose a different lace or fringe for the hem.  See you soon!


Thursday, 15 March 2012

Knitting A Dress In The Round: Lower Bodice

The decreasing section of this dress is more fiddly, as I decided I wanted to have darts down under the busts for subtle(ish) shaping.

The diagram (hooray feeble MS Painting) on the right represents your finished frock.

Dotted lines = picot rows.  Note the under-bust picot row after the decrease rows.

Strong black lines show the direction of increases and decreases.  Measure yourself along the long red line before beginning your decrease rows.

Measure the length generated by your increase rows (short red line).  This will be mirrored by your decrease rows.  If between them they do not add up to the length of the bodice total, you will need to add an appropriate number of plain knit rows between increasing and decreasing (as shown on diagrams).

To locate your darts, measure the distance between the centre of your chest and one of your *ahem* most pointy areas.  Using your gague (stitches per inch), count back an appropriate number of stitches from the centre of your garment and place another stitch marker.  Mirror this pattern to find the beginning of your second dart on the other side of the garment.  As the distances will vary, stitches between the darts are not marked on the chart.

The chart below should be followed from RIGHT TO LEFT and includes a pattern for the increase rows.


Tuesday, 13 March 2012

Knitting a Dress in the Round: Upper Bodice

N.B: the working edge is nearer the bottom of the garment, so this  is 'upside down'

After all my protestations of feebleness after (barely) knitting the Hurricane Hat, I've begun to knit a dress in the round.  My logic was as follows:
1) a dress is just a very wide tube with sleeves.
2) some dresses do without sleeves, making them even more of a tube.
3) My mother just showed me how to do a 'picot hem', which produces an even row of holes all the way across/around a garment.
4) A picot hem makes an excellent way of threading colourful ribbon around an edge, to gather and tighten a garment at the bustline or waist.
5) If I measure myself, and work out where to increase and decrease at the right points, I could make a widening and narrowing tube which gathers ribbon-taut around ma bazongas.  This would be impressive, and warm.
6) If I did the lower half in lace, it would be less warm and less stuffed-caterpillar-looking, and have more give in the fabric to get a good fit.
7) TO KEMPS!

I have never swatched so much as I have swatched to design this project.  Swatching is when you make a little square of fabric with your chosen wool on your chosen needles, and measure how many stitches per inch you come out with.  This is your gague.  If it's too many compared to your pattern or the count on your ball of wool, you need bigger needles; too few, smaller.  I also used my swatches to test different kinds of increase and decrease out, trying to find the most appealing.  The incredible TechKnitting blog (linked at the sidebar) has been an invaluable help with this.  I recommend you follow it, for the diagrams alone.

Picot and Lace Knitted Dress - Upper Bodice

To generate my dress, I swatched out my white fingering-weight yarn on 3.5mm needles.  I measured myself at key points (vital statistics etc.) in inches, then multiplied those numbers by my gague to find my cast-on number, and targets for increasing and decreasing to.

The first part of the project is the picot hem.  Cast on as above according to your (measurement under the armpit x gague), adding stitch-markers every 20 stitches.  Knit round 3 rows.  On the fourth row,

*knit 1, yarnover, knit two together* - repeat between the ** until you reach the end of the row, and knit any remaining stitches.

Showing two lines of 'picot' and the increased and decreased central diamond

Identify the centre of your garment, opposite the beginning of the row.  Place a stitch-marker there as you knit your next row.
To identify the number of increase stitches you need, calculate the difference between your under-armpit and bust measurements.  Multiply this by your gague.  I came out with 2 inches, or 15 stitches, because I have no bust.
The increases form a triangle at the centre of the work:
1) knit; find marker; increase 1; knit;
2) knit; find marker; increase 1; knit 1; increase 1; knit;
3) knit; find marker; increase 1, knit 3; increase 1; knit;
4) knit; find marker; increase 1, knit 5, increase 1; knit;
5) knit; find marker; increase 1; knit 7; increase 1; knit;
6) knit; find marker; increase 1; knit 9; increase 1; knit;
7) knit; find marker; increase 1; knit 11; increase 1; knit;
8) knit; find marker; increase 1; knit 13; increase 1; knit
etc. for larger busts.

That's enough for now - I'll continue these posts as I work my way down the dress.  The decrease rows are a little more complicated.

Monday, 9 January 2012

Lace Knitting - Purl Two Together Through Back Loops

After finishing my first real piece of lacework, I wanted to have a go at a more complex pattern.  I eventually produced the following, which is probably the biggest test-swatch ever:

I'm probably going to send this to my mother to make into a kidney-warmer as she is always complaining of having cold kidneys.

For the pattern I had another quick look on Ravelry, didn't find anything I liked, then simply Googled 'leaf lace kntting' or something.  This pattern for a scarf looked lovely and claimed to be simple.  I can verify both!  Instead of casting on 39, I initially cast on 120, did a knit-3-purl-2 ribbing border to start, decreased one every twenty stitches, and then repeated the pattern across in three sets.  When I'd done nine sets in total I did another knit-3-purl-2 rib border, and cast off.  My holes are a lot bigger than others who have tried the pattern, as I am using the wrong size needles for my wool. 

Stiches learned in this pattern included two different kinds of decrease stitch.  The SKP (slip knit pass) or skpsso (slip, knit, pass slipped stitch over) speaks for itself; it's a mini cast-off essentially.  The p2tog tbl (purl two together through back loops) is more complex.  As I mentioned last post, it was my granny who showed me what the back of a stitch was, and now that I have my new camera I can show you!

This is the front of a stitch:

And this is the back:

To start a p2tog tbl, find the two back loops by turning the left needle round towards you and scooping up the backs right-to-left (purlwise).  Then purl them together as usual.

Casting on in large numbers without losing count, and making sure that I started each of my sets in the right place, was greatly helped by the use of these little stitch-markers.

Stitch Markers
You Will Need: Medium-sized beads with large holes, yarn of a contrasting colour to the working yarn, scissors

Pass the end of a bright yarn through the bead, and make a triple granny-knot across your index finger to preserve the loop.  To use, slip a marker onto the needle at a landmark point  or every 20 stitches when casting on.  As you come to them in your knitting, simply pass the marker from left needle to right and ignore them, carrying on with your pattern.  They will follow you up the work.  If they occur between two stitches to stitch together, pass the first stitch to your right needle, remove the marker, pass the first stitch back, make the k2tog or p2tog or whatever, and replace the marker on the right needle.

Wednesday, 4 January 2012

Knitting Reblog: Lace Bolero by Kelly Maher

For Christmas, among other things, I was sent a hank of wool from Routt County, Colorado by my mother.  It was so colourful, and so local to her area, that I wanted to make something entirely from it in one go to show it off, rather than do many mittens with it as she had intended.  A quick search on Ravelry turned up this pattern for a bolero or shrug - bolero is to cardigan as fingerless gloves are to normal gloves I reckon.

http://kellymaher.wordpress.com/2007/07/04/ribbed-lace-bolero/

It took a lot of blocking to get it not to stretch quite so hugely across my shoulders, but I'm satisfied with the effect; the blocking also made it felt a little, softening the fibres.  N.B. 'Blocking' is the process of making a piece the right shape, evening out the stitches and stopping all-stocking-stitch pieces from curling at the edges as they do naturally.  Hand-wash the knitting in warm, soapy water; rinse it out; squeeze out as much of the water as you can, then lay it on a towel on a flat surface.  Stretch, weigh down and/or pin as necessary into the correct shape, and allow to dry completely.

The lace pattern is particularly easy and beautiful, and I hope to learn more about how lace works as I do more projects.  Yarnovers, which create a single loop of wool and leave a hole in the finished article, puzzled me at first but my grandmother was able to show me what the 'back' of a stitch was.  Another useful skill gained from this pattern was the maths for working out inches-to-stitches - this was the first thing I've knitted where I bothered to do a 'swatch' first to work out my gague, but it was worth doing as my yarn was significantly thinner than recommended.  I think I could still probably have made it smaller, as is usual with my clothes, but we live and learn.

Skills I couldn't pick up included the mini-cable row to transition between the lace and second set of ribbing rows, so I just missed that out.  I also didn't switch back to smaller needles for the second rib set because I'd left them at my dad's place, but it doesn't seem to have made too much difference.

It's nice not to have a huge amount of wool left over from this project; with stuff so cheap at Kemps Wool Shop I always over-buy and end up with masses and masses hanging about.  No worries - one of these days I will be arsed to make a jumper out of my leftovers, and then I will probably not have enough.

N.B. Photography for this post, and hopefully all future posts, was taken by the boyfriend for me with my own cheapo point-and-click digital Nikon, so I can stop stealing things from google image results and abusing the photography skills and generosity of my stepmother now.    Look out for much more photo-ridden and hopefully more helpful posts in future, and I'll probably go back and update a couple of things from the archives as well!

Tuesday, 13 December 2011

Knitting Reblog: Hurricane Hat by Andrea Goutier

It's great to be knitting again after a while, and now that I've booked the flights to go and see my mother in the Colorado Rockies it seemed only fitting to start myself a skiing hat.  A quick search on Ravelry turned up this lovely pattern by Andrea Goutier
: http://stringinmotion.blogspot.com/2008/04/hurricane-hat-copyright-sunshineknits.html


I have to admit that mine has not got the lovely swirls on it much at all - I was convinced I had misaligned my purl stitches for the first two inches, and then decided to abandon the decoration and do all knit stitches for speed as I needed my earwarmth quickly!  But looking at it now, the swirls are putatively visible and I'm sure you can make them work.

I am in awe of this lady for being able to think up a pattern in the round.  One day I hope to be a much better designer than I am, but in the meantime borrowing the genius of others to create necessary warmth will do.

I've also been following the blog Dances With Wool on Blogger, which is a beautifully written diary from a lady in Finland.  Her Advent posts, counting down the few hours of daylight in the harsh Arctic December, are particularly touching.


Tuesday, 4 October 2011

'A Little Promptu'

Such was the conversation which resulted in this little fellow, and actully a little friend for him as well...

He is a 'little promptu', or 'promptu' for short - and they are very easy to make at short notice - impromptu promptus!  He is an odds-and-ends creation using wool from making chicken-wattles, felt from Socky and cuddly stuffing from John Lewis (because all my cuddlies have quality inner cuddleness).  I was able to take all the tools and bits needed to make him to the slightly promptu barbeque in question, and whip up one for D in about an hour.

Little Promptu
You Will Need: Wool (half a ball or less of thickish stuff) knitting needles, 6mm; sewing scissors; felt; needle and thread; wool needle (with large broad eye for sewing with wool); stuffing.

1) Cast on 4 sts, leaving a long 'tail' of non-working wool.  Work 2 rows (the promptu is a stocking-stitch or smooth creature).
2) Increase at the beginning and end of row 3.  Work another couple of rows.  Increase at the beginning and end of the next row.  Continue increasing every other row or so until you have an even snouty triangle about 12 stitches wide at the needle.
3) Increase at the beginning and end of each row until you have 16 stitches altogether.
4) Knit approx. 3 inches on these 16 stitches; this will form the promptu's body.
5) Knit halfway across the row (8 sts).  Turn the work and purl these 8 sts.  Turn and knit 8. Cast off the next row, and leave a long 'tail' end.  Pick up the remaining 8sts on your needle and do the same on the other side.  These will form the promptu's legs.
6) Using the first long 'tail' from casting on, sew the promptu's snout together and as far down the middle of his tummy as you can get.  Roll his legs into little cylinders and sew down the inside edges with the tails from casting off, making a good strong seam in his groin and going up his tummy a bit if you can.
7) Cut out circles of black felt for the soles of his feet (not visible in the photo but very cute) and stitch them on with ordinary needle and thread.  Cut hands, with a slanting edge for the 'wrist' out of more felt and stitch them to the sides of his body.
8) Stuff your promptu tightly and fat!
9) With a new piece of wool if necessary, sew up the gap in your promptu's tummy.  Reaching his chest, make a strong stitch through his chin and pull his head down onto his chest.  Fix his head here firmly with a few more stitches.  Pass the needle through the back of his body to come out near his bottom, and cut off the wool to make a tufty tail.

Promptus have no eyes because I am lazy and they live underground like little moles.  But you could give them eyes if you like - very small beads or buttons.

Wednesday, 21 September 2011

Poultry Puppets


These poor souls have been off the blog since I made them, and I can't even remember when that was. It was definitely months ago, but then that's what you get for breaking your own digital camera and not visiting your brother often enough so he can provide piccies for you.  I insist on having pictures for knitted creations because otherwise the instructions *make no sense*.  Hence delay.  Apologies.

Unfortunately having finally got round to acquiring a picture at a lovely barbeque (with the beneficiary of the chicken modelling it beautifully in the background) I have now almost forgotten the instructions.  I was making the pair (yes, pair) of chickens up as I went along basically, fitting the sock to my own hand, so I can only give you a very rough guide indeed.  If you have any trouble and really want to know? I could work it out from the originals and message you, but you can't go far wrong here as they were designed to be pretty shapeless and crazy items.

Poultry Puppets
1) Cast on about 40 stitches, and knit a tube in the round on your double-pointed needles as far as you would like the puppet to extend below your thumb joint.
2) Turn the heel; the heel flap will go up the back of your hand
3) Make the gussets and decrease etc. according to the tutorials from Socky.
4) Based on how big you want the beak, decrease a bit into the 'toe'.  To join on the beak, alternate first yellow-body-body-yellow-body-body, then yellow-body-yellow-body, then all yellow coloured stitches.  Tie off the body wool safely.  For knitting in two colours, see Lizard.
5) Divide 2/3 of your stitches onto a 'top' needle, and the remaining 1/3 onto a 'bottom' needle.  On each needle, knit an hourglass shape, i.e. starting with many stitches decrease carefully on both sides to a point, then increase on both sides again to many.  Measure onto your fingers as you go along.  Cast off the finished hourglasses.
6) Stitch the hourglasses together into pouches which can fit your thumb and fingers into them.  Join the back of the throat together carefully - the lower edge of the top triangle to the upper edge of the bottom triangle, leaving holes for fingers and thumbs to get in.
7) Cast on 6-10 stitches in fat red wool, and knit two rows garter stitch (all knit sts both sides).  Follow Step 9 of Socky's ears to make a comb, possibly a little blunter than Socky's ears, and then cast on 5-7 sts and make two 'fingers' or spikes to make wattles.
8) Sew on comb, wattles and buttons for crazy eyes in appropriate places.  If wanted, get a bit of red felt for a rabid, pointy tongue.
9) BUUUUUUK!

Saturday, 8 January 2011

Knitted kangas!


This is the first thing I knitted after I decided that I was going to learn to knit again.  I'm very grateful to my friend R for the pattern, which she kindly lent me the original copy of and which you can find a poor scan of in the previous post.  The wool I used for this kanga wasn't particularly snuggly, and I think I got the ears a bit wrong, but it made an excellent birthday present for an Australian stepmother...


Purple Kanga also came with purple baby Roo, who fits nicely in the pouch with a bit of a squeeze.  When I met a very little boy with two favourite kangaroo toys the other day and decided to give him another one, I thought baby might get lost so left him out.


Yellow Kanga was made with a linen mix from Kemps Wool Shop and proper cuddly stuffing (rather than cotton wool) which is why he is bigger and fatter than purple Kanga.  His eyes and nose are stitches of black embroidery thread rather than buttons, as the baby who is to own him is 18months ish and might chew his eyes off and swallow them.  

If you'd like to make your own kangas but can't read the pattern in the previous post, (and I think most will struggle), I make a vow of confidentiality now and promise to email the big scan to anyone who PMs me their address.

Knitted kangaroo pattern

Friday, 30 July 2010


Here he is! Oh, him? That's my friend Kit, he got very attached to Socky on the night we had a bonfire. And the blue-jumpered one is me!

Wednesday, 31 March 2010

SOCK DRAGON! part 1


Look at the shiny! I got 4 balls of that at Kemps Wool Shop online for less than eight quid, including postage and a pair of 6mm needles to practise on. bargain! and very dragony, I'm sure you'll agree. In fact it was so dragony just by itself, I thought it would be silly to make things difficult for myself by doing fancy stitches. Instead, my sock dragon will use a simple sock heel to wiggle up and down and be plain stocking stitch all the way along.
I decided to follow this sock tutorial to make the kinks in my dragon's body, as they had nice pacing and diagrams. First though I had to get used to knitting on 4 double-pointed needles or DPNs. Before that, I had to get some DPNs.

The sock tutorial said that the best DPNs were bamboo, because the stitches were much less likely to slip off the needles that you weren't using at the time. I can confirm this, having decided to make my own out of Wagamama chopsticks. By comparing with my 6mm normal needles I decided that despite the elliptical shape it would be fine to whittle the ends off them to make super-cheap dragon-making equipment.
I got a penknife for my 11th or 12th birthday, Swiss Army actually, and of course the first thing I did with it was take the end off a pencil. This wasn't that unlike, although the glued ends were considerably more difficult to carve than the pointed ends, in terms of density of grain. To stop them splintering so much I sanded the ends viciously with my everlasting emery board, though normal ones would do if you don't have real sandpaper I can tell you. I can also tell you if you haven't used a woodcarving knife before that you will be tempted to use your thumb to push the blade away from you. This is all very well if you're using a straight blade, but if it can fold back into the handle like my Swiss does then ON NO ACCOUNT push too far along towards the point as it will flip back into the handle, which, of course, has your hand on it. Believe me this is all from bitter experience.

I am pleased to say that despite the fanciness, thick-and-thinning and ribbon-entwined nature of the wool, beginning on Socky has not been a bitter experience. I am building up to the first heel, and very excited! as he is about 4 inches long. I will have to do his head separately, but that can wait until I've really mastered the technique I think, as his head will probably be one, smallish, actually toe-tied sock.

Watch this space...

Thursday, 25 February 2010

Lizard

After the Space Inavders, which gave me an opportunity to practise casting off and on in the middle of rows, I decided I wanted to develop more techniques. My final view is towards making a dragon toy, with multicolours, scales and ridges, which wiggles along in his body like a Chinesey one. I haven't started on him yet due to time constraints and having a cross-stitching phase, but little creatures are how I taught myself knitting in two colours, moss or seed stitch, and making bobbles, all of which I intend to use for the dragon eventually.

Lizard - Moss Stitch and Two-Colour Knitting

You Will Need: some wool in 2 different lizardy colours, and felt and thread for eyes, tongue and feet! Mine was green (from Clanger-wool) and purple (from Kangaroo-wool); the felt was also acquired for Clanger and there was plenty left over. Lizard is a tube; the whole body is knitted as a piece, decreasing and increasing again to make the division between head and neck, and then rolling him up like a cigar.

The easiest way for me to lay out the pattern for you is as directions as to what to knit and what to purl on each row, using symbols K for knit and P for purl, changing colour when the wool does. It looks complicated, because it's moss stitch, but once you realise that all you're doing is knitting all the knits and purling all the purls in big stripes, it doesn't look so bad. I wanted his tummy to have a different texture to his back, so the sides of the piece are in stocking stitch which comes out smooth on one side and wibbly on the other (the inside when he's all stuffed.)

You'll need to know how to increase and decrease at the ends and beginnings of rows. The easiest way to increase is to have the first or last stitch on your right or left needle respectively. Stretch the knitting apart, and pick up a loop from in between the two stitches with your left needle. Then work that stitch, and carry on as usual. To do it twice at the beginning of a row, just do that twice. On the end of a row, leave two stitches rather than one on your left needle and put an increase between each of them in turn. To decrease, just slip one stitch over the other as though binding off. You'll need to slip two stitches onto the right needle first at the beginning of a row, and the last stitch onto the right needle at the end of a row.

Casting On: This is a bit complicated. Cast on 2 stitches with your main-body colour. Then make a slipknot in your stripe colour and add that. Then cast on another two stitches of body colour, being careful not to get the ends tangled up in each other. You should now have 5 stitches like this: SSSSS. I was greatly helped in my understanding of this pattern by remembering always to 'purl the purple.' I knew that there would always be a knit and then a purl on either side of the purple one, so I could keep track of everything easily. When you're not knitting the stripe-stitches, let go of that coloured yarn and only use the main one. When you need to make a stripe-stitch, drop the main yarn and pick up the other one. If you keep hold of both all the time, you get a weird interlace effect, which I only noticed halfway down the tail. Remember always to pass the yarn you're using to the back or front of the work, depending if you're knitting or purling with it at the time. This is tedious but it stops you getting in a muddle.

Here we go!


K K P K K


P K P K P


K K P K K


P K P K P


K K P K K


P K P K P


K K P K K


P K P K P


K K P K K


P K P K P


K K P K K


P K P K P


K K P K K


P K P K P


K P K P K P K


P P K P K P P


K P K P K P K


P P K P K P P


K P K P K P K


P P K P K P P


K P K P K P K


K K P K P K P K K

P P P K P K P K P K P P P
K K K K P K P K P K K K K
P P P K P K P K P K P P P
K K K K P K P K P K K K K
P P P K P K P K P K P P P
K K K K P K P K P K K K K
P P P K P K P K P K P P P
K K K K P K P K P K K K K
P P P K P K P K P K P P P
K K K K P K P K P K K K K
P P P K P K P K P K P P P
K K K K P K P K P K K K K
P P P K P K P K P K P P P
K K K K P K P K P K K K K
P P P K P K P K P K P P P
K K K K P K P K P K K K K
P P P K P K P K P K P P P
K K K K P K P K P K K K K
P P P K P K P K P K P P P
K K K K P K P K P K K K K

P P P P K P K P P P P


K K K K P K K K K


P K P K P


P K P K P


P K P K P


P K P K P


P K P K P


P K P K P


K P K


P


K K K


P P P P P


K K K K K


P P P P P


K K K K K


P P P P P


Casting on is fiddly - make two stitches in main colour, then add a slipknot of the stripe colour, then another two main colour. Increase at both ends of rows 15, 22 and 23; then continue for 20 rows; decrease by one at both ends at rows 43 and 44, and 50, 51 and 52. When you need to increase again to make the chin piece, drop the yarn for the stripe and continue in main colour only; cast on a stitch at the beginning of row 53 and increase into that in the usual way.

To make up, fold the chin under the head and sew along the sides. Now roll the body into a tube and sew all along the tummy, from the tail to the neck. Stuff with cotton wool as you go, or lentils if you want him a bit floppier and weightier. Tuck the flaps of stocking-stitch under the chin to attach the neck to the head. Now cut out and sew on tiny circles of felt or beads for eyes, a forky tongue and splayed little legs :D

Fin!

Wednesday, 24 February 2010

Space Invaders

Hey there!

I've been teaching myself to knit for a while now. I started with a kangaroo plushie pattern borrowed from a friend, as a christmas present for Dad's aussie girlfriend. Then I invented a pattern for a pair of ravens for Dad himself, which didn't work out so well - they did look a bit like whales really. After that I made a zombie Clanger for the boyfriend, which worked out very well and combined knitting with sewing and creative felt-work. I'll post the patterns for those as soon as I can scan them in, and get pictures! But right now I'm going to tell you how to make Space Invaders.

After the success of Clanger, I started looking for geeky things to make and stumbled across someone's attempt at a knitted Space Invader plushie. Now, in all fairness, I admired them for trying but it did look a lot like a beanbag with legs. Mine turned out just like the real thing, and I had some lovely green wool left over to make them with. The best thing about this pattern is that it can be sized up or down very easily. Each 'pixel' in these patterns is five stitches wide and deep, but you could make one with three, four, six, whatever, depending on how big you want the finished Invader to be.

All you need to know to make these is how to knit, purl, cast on and cast off. If you have trouble understanding how to make the eye-holes, I can recommend this link which explained how to cast off and on in the middle of rows to me : http://www.knittinghelp.com/forum/showthread.php?p=1066850

Good luck! pew-pew...


To make this little guy, the most iconic of the Invaders, takes a bit more patience than his friend, especially when you get to the stuffing stage.

First, cast on 5. Knit 10 rows of stocking stitch (knit one row, purl next row.) Bind off. Repeat another 3 times so that you have 4 pieces of knitting. Fold them in half lengthwise to make 5x5 'pixels' and sew up with the ends inside. These will form the Invader's 'antennae.'

Cast on 10. Knit 10 rows of stocking stitch, (or st.st.), bind off. Repeat. Fold each of these two pieces in half and sew them together to make 5x10 'mandibles.'

The main body is a bit more complicated.
  • Cast on 35. Knit 5 rows st.st. , starting with a knit row.
  • At row 6, cast on 5 at the front end of the work. Purl 10 stitches. Cast off 5 stitches in the middle of the row, remembering to purl two first, then pulling the first of those over the second one. You should still have 10 stitches on your right needle, and 30 on your left. Purl the next 15 stitches, then cast off another 5, remembering to purl the first two and bring the first over the second. You should now have 10, gap of 5, 30, gap of 5, 5.
  • At row 7, cast on 5 at the end of the work and knit 10, up to the gap. Now turn the work and work another 3 rows st.st. as though the piece was only 10 stitches wide. After these 3 rows, break the yarn leaving a long tail. Pick up the ball-end in your left hand, holding a good amount, and begin knitting again after the gap on the block of 15 stitches. Knit 4 rows st.st., then break the yarn again, leaving a tail and pick up again with the last block of 10 stitches. Knit 4 rows st.st. on this block. You should now be ready for Row 11.
  • At row 11, you will join all the blocks together again. First, cast on 5 and then knit 15 until you run out. Now cast on another 5 from the end of the middle block, and knit these with the first block so that the gap closes up. Be careful to count here how many stitches you actually have - depending on the cast-on you use, you sometimes have to do one more stitch than you think. At the next gap, cast on another 5 and knit 15 to the end of the row. You should now have 50 stitches in total.
  • At row 12, cast on 5 at the end and purl the whole row, 55 stitches. Knit another 3 rows of st.st.
  • At row 16, you begin making the arms. Purl 5. Cast off 5 to make a gap. Purl 35. Cast off another 5. Purl 5.
  • Row 17 onwards is worked in 3 blocks again. Take the first 'arm' and knit 14 rows of st.st. on those 5 stitches. Then bind off. Pick up the ball-end and begin knitting the block of 35. Knit 4 rows of st.st. Then knit 5 stitches, cast off 25, and knit 5 again. Knit 4 rows of st.st. on each of the sets of 5, binding off to leave 2 little stumps divided by a 25-stitch gap. Now pick up the ball-end again and knit the second 'arm,' 14 rows of st.st. and bind off.
Repeat this pattern again exactly so that you have two Invader shapes with no antennae or mandibles. 'Block' the pieces; this means soaking them in warm water, then flattening them out on a surface (kitchen towel on a table works well) blotting out most of the water and leaving them to dry. This stops them curling up as stocking stitch is wont to and makes them easier to sew together.
Now you are ready to stuff your invader. This is pretty self-explanatory except that around the eyes is difficult - there will be a loop across the bottom of the gap, which you should carefully tuck in before sewing the eye-seams together. Stuff the top of the head first, before you finish going round the eyes. After stuffing completely, stitch the mandibles diagonally to the inside corners of the tabs on his bottom, and the antennae-pieces in pairs to the top seam in line with the eyes and diagonally from the outer corners of those.

Fin!


The more octopoid Invader is much quicker and easier to do than his brother, and uses the same technique for the eyes, so although I made him second you might want to do him first as practice.

Cast on 5. Knit 10 rows st.st., bind off. Repeat another 5 times, to make 6 pieces total. Fold in half to make 5x5 pixels and sew together.

Cast on 10. Knit 10 rows st.st., bind off. Fold in half and sew together to make 5x10 joining-piece.

For the main body:

  • Cast on 10. Knit 5 rows st.st., starting with a knit row.
  • At row 6, cast on 5 and purl the whole row. At row 7, cast on 5 and knit the whole row (20 stitches.) Knit another 3 rows st.st.
  • At row 11, cast on 5 and knit the whole row (25.) At row 12, cast on 5 and purl the whole row (30.) Knit another 3 rows st.st.
  • Row 16 adds the gaps for the eyes. Cast on 5, purl 10, cast off 5 to make a gap, purl 10, cast off 5 to make gap number 2, purl 5.
  • At row 17, cast on 5, then knit the rest of that row and the next 3 in st.st. on the set of 10. Break the yarn and resume knitting the middle block, adding another 4 rows st.st. Break the yarn and resume knitting the final block, adding 4 rows of st.st.
  • At row 21, DO NOT cast on 5. Knit 10, then cast 5 onto the middle block and join the two together by kntting the resulting 15 stitches. Cast another 5 onto the end block and knit the rest of the row. You should now have 40 stitches in total.
  • Knit the next 4 rows in st.st.
  • At row 26, cast off 10, purl 5, cast off 10, purl 5 and cast off 10 leaving two stubs. Break the yarn and pick up again on the first stub of 5, knitting another 4 rows st.st. and binding off. Do the same for the other stub.
Repeat the whole pattern again to make two pieces, and block them flat. Sew up and stuff carefully, remembering to tuck in the loops around the eyes as you hem them and stuff the head first. Now sew the joining piece between the corners of the stubs so that they are connected. Sew on the small pixel pieces carefully, following the picture.

Fin!

If you have any questions about these patterns or have any problems, please leave a comment. I promise to have photographic proof of the Invaders' existence up soon! In the meantime, make your own and send me pics of yours!