Pages

Showing posts with label patchwork. Show all posts

Monday, 7 February 2011

Patchwork Part 3: Housecoat Pattern (Body)


Here you see my (probably highly inefficient) solution to the problem of making an entire coat out of lots of little pieces.  It involves a lot of 'singles' i.e. hexes which aren't made into flowers, including some 'fourers' on either side of the central back flower, but I think it works.  
The diagram above shows the back of the coat (laid flat) at the bottom, and the front wings at the top.  The black line represents the shoulder 'seam'.  On either side of this seam, coloured flowers in the bottom half are matched by ghostly flowers in the top half - these correspond to each other and show where the two pieces should be joined at the sides.  For example, the green flower on the right of the back piece should join to the yellow and grey flowers at the front in the way shown.
The colours are chosen for ease of diagramming, not representing either your attempt or mine!  I managed to slightly co-ordinate my flowers so that the hotter colours were at the top and the cooler colours at the edges.  

Once I'd stitched all of this together, side-seams and all, I could wear it - and in fact had been doing so intermittently to check the length for a while.  You could easily make it longer by adding more flowers or singles to the bottom edges; I personally was getting impatient at this point and started on the next stage, which is taking all the paper out.  I left in the papers at the edges of the garment so as to make sewing in the lining and sleeves easier, but the rest I removed.  It's lovely to see the colours pure and unsullied by tacking stitches, and very easy to yank out said tacking in an afternoon.  SAVE THE PAPERS.  If you ever want to patchwork again you will save yourself a lot of bother if you already have all your templates handy.

When I have the time I shall look through the scraps my grandmother gave me and see if there are any pieces big enough to make a lining out of, or sleeves.  I'd like the sleeves to be slitted with poppers so that I can easily roll them up to wash up in.  Watch this space...

Sunday, 14 November 2010

Patchwork Part 2: Grandmother's Flower Garden


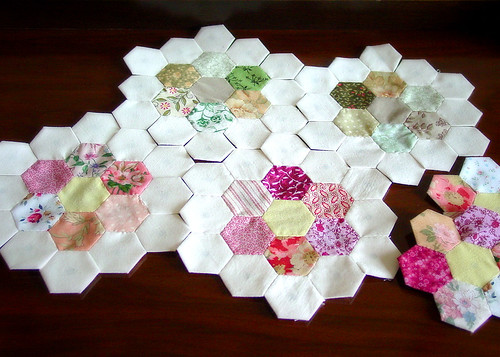
Last post, I told you how to make the basic hexagons which make up a traditional piece of patchwork.  of course you could make squares, or indeed any polygonal shape, or combine different shapes - as long as the results will tessellate.  Hexagons however have something elegant and professional-looking about them, and arranged into 'flowers' as you can see in the above picture make for beautifully organic designs.

'Grandmother's Flower Garden' is the name of the pattern being created above, but I don't have enough white or other single-colour fabric to form the edges of my flowers, so instead I'm just going to sew together the seven-hex shapes you can see on the right - just as Mum did for my quilt-cover.

Making 'Flowers'
You will need:
7 hexes, either different colours or 1 of one, 6 of another
Cotton thread in a complimentary colour for both kinds of hex (e.g. black and rust hexes, brown thread)
needle, obv

BEFORE YOU START: Remember the Rules of Sewing - never use a thread longer than your own arm, and don't panic if you get loops - they can be prevented by letting your needle dangle freely on the thread occasionally.

Hooray for the return of shoddy MS Paint diagrams!

1. Lay out your hexes as you would wish them to appear, right-side up.  This is important when dealing with some patterns and stripes (see fig. 6.)
2.  Taking the central hex, position the edge of your first outer hex against it and flip it down so that the right-sides (outsides if you were wearing it) are facing each other, with the seam you are about to sew uppermost.  Right sides, remember!
3.  Sew right-to-left along this edge.  Don't worry about the papers and tacking stitches, we'll deal with that when it's all finished.  Use the stitches shown in these videos.
4. The tricky bit.  Consulting your layout and the right-side of your work if necessary, position the next outer hex alongside the first one.  Sew the dotted blue line, where the solid blue line is the seam you've already completed.  Tie off.
5.  Rotate the work.  Repeat Fig. 3 for the second outer hex, and then add the third by sewing a 'radial' seam as in Fig. 4.  Continue until you come to the last radial seam, which will be the other side of the first hex you added.
6.  Especially with stripes you can create a nice symmetrical effect.  I find it easiest to do my seams in the order described, because it feels like it involves less tying-off and on again than my mother's method:

1. Attach all outer hexes to the inner hex in a continuous seam.
2. Complete all the radial seams in turn.

If you find the second one easier, then it all averages out in the end; the Mum way is probably easier for stripe-co-ordination for beginners.

Soon - the coat pattern!

Wednesday, 10 November 2010

Patchwork


I am the proud owner of a patchwork quilt-cover made by my mother.  Patchwork nowadays is a very old-fashioned hobby; it dates from the time when leftover fabric was a real resource to be saved, and when women needed things to do which were repetitive and occupied the creative parts of their brains to stop them from thinking things like 'perhaps I could leave the kitchen one day' and 'wouldn't it be nice to vote.'

Luckily for me English patchwork has never quite died, and now I can see the pattern of my early childhood laid out on my bed - from the silk and cotton shirts which Mum used to wear, to the stripy red and white of my primary school summer dresses, to the lining from Dad's old favourite coat.  I have also been left a hexagon template for making my own pieces, and seeing as I am now unemployed and lazing about the house with nothing to do, I have decided to create a patchwork housecoat - giving me something to do and a warm garment to laze about in.  I'll post the method or pattern for that when I get to that stage, but at the moment I'm still making hexagons, so I'll show you how to do that.

Making Hexagons
You Will Need:
Stiff paper or very thin card
Scissors for paper
Scissors for cloth (if you use the same scissors then they will become blunted and useless)
Bits of old dressmaking fabric, torn clothes, grown-out-of clothes (explore handing-me-down first)
Cotton thread in a bright colour
Plastic bag for scraps which inevitably result
Template

The last item is the most difficult to get hold of; every piece you make must have every side the same length to within about 2mm, so use a proper template such as can be printed off from here.  Using this template, cut out paper hexagons; you may be able to print the lines directly onto your paper.  I used my mother's metal hexagon as a stencil.

Cut out squares from your fabric pieces using your sewing scissors, so that there will be at least 1cm of seam allowance around your paper hexagons.  If you're cutting up a garment, cut swaths out from between the seams first, i.e. each side of a shirt as you would iron it, or opening out the legs of trousers; folding seams around the paper is awkward and makes for uneven hexes.  You could save or bin the resulting seamy scraps; if you saved them you'd be making a peg-rug, but I don't know how to do that and think that peg-rugs look like the seaweed mats which form in the oceans, so I binned them with joy.

Lay the paper hex on the wrong side of the cloth (the wrong side would be the 'inside' if you were wearing it) and fold  the fabric around the corners.  Using a single stitch at each corner, 'tack' the fabric to the paper as shown in these videos.  Leave an inch of thread tailing off the last stitch, cut the thread and begin another hex. Stack hexes by colour so that you know how many of each you have.

Once you've made all your hexagons you can decide how you want to sew them together.  Depending upon your commitment and level of extroversion, you can combine contrasting or complementary colours either in single hexes next to each other or as 'flowers' like the picture.  I went for the flower option, and I'll explain how to make those in my next post.