Pages

Monday, 21 January 2013

Needle-felted Koala


Having made the needle felted wombat, I got stuck on Australian fauna for a while and created this cuddly character.  An easy two-colour model, he's lovely as a stress ball or just a furry friend.

You Will Need: grey felting wool, large hunk; white felting wool, smaller hunk.  Sorry I can't be more specific on gram weights, but my hand in the photo should give a good sense of scale.  One felting mat and felting needle; black embroidery or darning thread, large-eyed needle.
If like me you're working on your lap, a bit of rough fabric is a useful way to keep your clothes clean of fluff.


First make an ovoid body, not too highly felted just yet.


Second, create the head - roll half as much wool into another ovoid, and pinch the ends into the realistic koala shape seen here - with two lobed ears.  Heavily felt in between the ears to define their shape. 


Felt a fine wisp over the body and head, joining them together firmly at the neck join.


Add his white tummy :)


Roll a long wisp together to make a leg.  After an initial felting, rub legs and arms between your hands to round them out, before felting some more.


Heavily felt at one end to make feet.


Attach the legs pointing straight up...


...adding the knees when they're attached to the body.  Just fold the leg over and stick the pin straight through his kneecap.


Front legs are very similar...


...but for the added white wool on the inside.  Join them on sticking straight out ready for a hug :)


Add two tiny tufts of white wool, folded in half and felted on the fold, to his ears.
Embroider the nose in long stitches from top to bottom, pulled very lightly taut.  Add two French Knot stitches on top of each other for each eye (for this stitch, see these instructions.) Pass the thread through the back of his head and snip off to finish.  Voila!

If you like you can now give him a little bath, warm water and lots of soap rinsed and squeezed out of him with a towel, and then a little final felting of any rough edges.

Saturday, 12 January 2013

Needle-felted Wombat


For my first more ambitious project making a 'real' animal, which was supposed to look like it did in real life, I chose a wombat.  They're called 'furry bricks' in their native Oz, because they are both solid and rectangular - a perfect Simple shape for an animal to be.  They're also endearing to my stepmother, so I knew the finished article would have a good home when he was done.

I purchased the wool from a company in Yorkshire called Wingham Wool (http://www.winghamwoolwork.co.uk/).  It smells of sheep - lanolin.  Mmmmm.  Wombat still smells of sheep.

You Will Need: Large wisps dark brown wool, two black beads for eyes, sewing needle and black cotton thread, felting needle and block.

Step 1: select your wool.

Step 2: roll and felt it into an oval shape.


Step 3: add a ball at one end for the head.  To get the stripes on the body going the right way, add a wisp from head-end to tail-end.

Step 4: Heavily felt the join between the body and the head on one side, to make a neck sloping down.


Step 5: make the feet/legs (wombats are so stumpy!) Felt the middle of a large wisp to the body, and roll the ends up into feet.


Step 6: Felt the feet until sturdy rather than wispy.  Use the edge of the block to get purchase.


Step 7: Turning to the head, add two tiny wisps for ears - make a rough folded-over triangle on the block, then shape further as you add them to the head.


 Step 8: Make 'eye sockets' by heavily felting and pinching the sides of the head to give the illusion of bone structure under the fluff.


Step 9: Wet your wombat in warm water and smoosh soap all over him to a) alleviate the sheepy smell and b) set the felting.  Rinse out the soap and squeeze out most of the water, being careful not to get him misshapen when you're done.

Step 10: Sew on little black beads for eyes and make a little down-arrow of nostrils in an oval of backstitch for his nose.


Monday, 7 January 2013

Lighter Christmas Cake

Many people dislike traditional Christmas cake.  It can be stodgy, contains sultanas (which I know at least one boy who hates) and involves marzipan and royal icing, each of which can be problematic in mixed company.  However, Christmas in my father's house would not be Christmas without a cake, and if it is a winter-stodge-cup-of-tea-type cake (which it should be), that means dried fruit.

The following makes a nice tasty round for the main holiday season, and won't burden you until February.  It's light enough to be a 'normal' cake, with enough fruit to satisfy the ardent traditionalists.

Lighter Christmas Cake with Apricot Frangipane

You Will Need: One 24cm cake tin, greaseproof paper and scissors; chopping board and knife; large bowl, wooden spoon; small bowl, cup, teaspoon; saucepan; medium bowl, measuring jug, sieve; food processor or blender, zester/grater, cooling rack, serving plate.

3oz dried apricots (and apricots to decorate)
2oz ground almonds
6oz light brown soft sugar
9oz butter
3oz honey
2oz sultanas
2oz dates (and dates to decorate)
100ml Stones Ginger Wine
4 large eggs
7 1/2 oz self raising flour
1tsp cinnamon
1/2 tsp nutmeg
1 or 2 oranges

1) Preheat the oven to 180degrees C.  Grease and line the tin with a circle of well-buttered baking parchment.
2) Chop the dates into little pieces.  Soak the sultanas and date pieces in the Stones Ginger Wine.  At this stage, if your apricots are very dry, soak them in water separately.
3) Chop the apricots finely, and mash them in the food processor.  Add 2oz of ground almonds, 2oz of brown sugar, and 2oz of butter.  Mush until combined.  Scoop into a small bowl, and add the yolk of one egg (save the white in a cup for another project).  Mix well and put by.
4) Melt the remaining 4oz sugar and 7oz of butter with the honey in the saucepan.
5) Beat the eggs in the large bowl; add the melted sugary mix in a slow stream, stirring constantly.
6) Strain the ginger wine back into the measuring jug, and put the fruit in the cakemix.  Save the wine, mix the fruit.  Gradually add the flour to the cakemix, along with the spices, and the zest of one of your oranges.
7) Now the fiddly bit.  Slice your orange into 1cm rounds, and turn these 'inside out', peeling off the rind, separating the segments along their sides and joining the ends of the chain to make a 'cog'.  Set these cogs inside each other on the bottom of the tin.  Fill the gaps between the teeth with slivers of date and apricot.

ProTip: Navel oranges will not be as good for this.  Remember that the finished cake will show the underside of the 'cogs' as you see them, so lay dates skin-side down and segments big-side down.  Peel off any excess pith or teeny segments from the middle.  Baby cogs can be made with a few segments; more than one orange is listed in the ingredients so that you can use the best slices from two.

8) Gently spoon over half of the cakemix, followed by the frangipane, then finish with the last of the cakemix.
9) Bake for approximately 1 hour, until a skewer comes clean.  If it starts to brown too much halfway through, give him a tinfoil hat.  Leave to cool in the tin for a good while before turning out.
10) Finish the cake by drizzling with the reserved ginger wine.

Thursday, 20 December 2012

Chocolate truffles


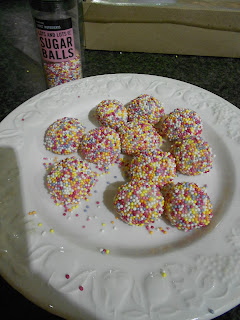
Don't they look deliciously precious?

This Christmas, as I had a few people who I owed a present and like but don't know intimately well, I decided to make my own chocolate truffles.  They're just personal enough, being home-made, not to offend if people get the same thing as each other in public; and just impersonal enough to work for almost anybody. 

Having said that, I chose the flavours carefully so that there would be a variety in every little package, and people wouldn't feel unable to eat any of their packet.

The wrappings were made from some cellophane I stole from work, and tied with the ribbons on some ordinary gift tags.  The truffles were shaped by pouring the liquid ganaches into silicone ice-cube trays.  These are becoming more common, and do make the job infinitely easier, but if you don't have one, no worries.  Allow the ganache to set in the fridge until firm, then scoop out teaspoonfuls and roll them into balls in your hands.  This is messy but fun.

Truffles in the mould


ProTip: Keep two saucepans out, one for heating cream, the other with hot water.  If your hot cream isn't enough to melt the chocolate by iteslf, place the mixing bowl over the pan of hot water and stir the ganache rapidly until it begins to loosen and melt at the bottom.  Take the pan off the heat and continue stirring vigorously until the ganache is smooth.  DO NOT overheat, or the choc will split and become a bitter, oily mess.

Chocolate Truffles (makes 10-20)
You Will Need for every flavour: Moulding trays (ideally), chopping board and knife, several small bowls, many teaspoons, small saucepans, measuring jug (minimum mark 50ml), spatula or wooden spoon.  To wrap: nice paper, ribbon or tags, scissors.

Cherry Brandy Truffles
100g dark chocolate
50ml double cream
25ml cherry brandy
glacé cherries, dark, halved
cocoa powder

1) Chop the chocolate as finely as you can - this will make mixing it easier.  Place in a small bowl.
2) Heat the cream until not quite boiling; add the liqueur.  Pour the hot liquid over the chocolate.
3) Stir the cream and chocolate together until completely melted and blended.
4) Chop the cherries until you have as many halves as you want truffles.
5) Half-fill your moulds*, add a cherry-half flat-side up, and top off with more chocolate.
6) Chill for at least half an hour in the freezer, 2 hours in the fridge.  Scatter a little cocoa in another bowl.  Turn the chocs out of the moulds into the bowl of cocoa, and shuffle about until lightly coated.

*this recipe is difficult without moulds, but you could give it a go - forming balls in your hands around half-cherries.  They will end up bigger and rougher.

Twinkly White Vanilla Truffles
100g white chocolate
30ml double cream
1tsp vanilla essence
decorative sugar balls/sprinkles

1) Repeat steps 1-3 from the first recipe, substituting the tsp of vanilla for liqueur.
2) Freeze the ganache for half an hour, until just firm.  Scoop into balls with teaspoons and mould in your hands.  You washed your hands, right?
3) Scatter sugar balls into a bowl.  Turn out truffles into the bowl and roll in the decoration. 

N.B. White chocolate gets its distinctive colour from containing almost no cocoa solids.  This means that it melts more easily and needs less cream to make a satisfying ganache.

Trebor Extra Strong Snowballs
You Will Need: Pestle and mortar
100g dark chocolate
50ml double cream
3-4 Trebor Extra Strong Mints

1) Make the ganache as for Cherry Truffles, witholding the liqueur.
2) Pour into moulds and freeze for half an hour to set.
3) Crush 3-4 mints to fine dust in a pestle and mortar; roll the truffles in the dust until coated.

Coffee Truffles
You Will Need: sieve
100g dark chocolate
70ml double cream
1 tablespoon fine ground coffee


1) Chop 100g of the chocolate finely.  Put in a small bowl to mix.
2) Heat the cream with the coffee granules gently, stirring, for a while to allow the coffee to infuse.
3) When the cream is hot and coloured, pour it onto the chocolate through the sieve.  You don't want grit in your chocs.  Stir until the choc and cream are well blended.  Not all of the cream will come through the sieve.
4) Pour the ganache into moulds and chill until firm, or chill and roll into balls.

To Present
A square of cellophane or paper 8ins on each side will just envelop eight truffles comfortably.  

Wednesday, 19 December 2012

Aran Cardigan finished article


It's finished!  Here I am modelling my big fluffy item on my Dad's incredibly expensive Italian sofa, posing pretentiously.  I'm particularly pleased with the sleeves, as I'd got my cable-eights really sorted by then. 

Sadly the acrylic yarn I used is not bobble-resistant at all, but it doesn't seem to shed; its moth-resistance will have to be tested later in the year when it gets put away for the summer.

My next knitting commission will take me a good long time; a friend of mine wants a 'sexy cable-knit' which is 'yuppie-y, but not too much' and the pattern I have gives the required gague in cable-stitches, so I will have to swatch like mad.  If I have any crafting-budget left over after the holiday season, I can feel more needle-felting coming on.  It's high time I combined it with beads to make easy, Simple birthday presents to last the rest of 2013.


Wednesday, 12 December 2012

A Simple Christmas


It's really getting festive round here.  At the house where I live, (where Christmas is very savoury-food-centric), the fridge is beginning to fill with ham, sausagemeat, red cabbage and turkey liver for paté.  I'm sure that at my father's flat the big red wooden reindeer full of drawers is doing his Advent duty.  Only yesterday I spent a very happy morning decorating the window of the shop where I work.  The air is nippy; the frost is on the ground; Oxford Street is heaving.

It's really high time we all started getting sorted, so to help out, I'm posting a list of all the festive advice and recipes I've given on this blog in one place.  You'll notice that there are some conspicuous absences from this list - nativity scenes, Christmas pudding, turkey or goose recipes, mince pies, and so on.  At some point I will post my recipe mincemeat mince pies made with real minced meat - not mincemeat, minced meat - or meatmince, if you will.  But I have to get them perfectly squidgy and flavoursome first.  As for the rest - I can only blog so much a year!

Decorations:
Needle felted
Leather

Christmas (fruit) cakes:
Figgy Upside-Down
Marzipan Painted Fruitcake
Orange Upside-Down Layer Cake

European Christmas Biscuits:
Pepparkakor recipe
Gingerbread house template
Gingerbread stave church
Basler Brunsli 

Traditions:
Die Hard and Biscuits
Advent

Flower arranging:
Christmas Greenery


Saturday, 8 December 2012

Joining Ends Of Yarn With A Felting Needle


A very Simple quickie today - ever had this annoying situation?  You get to the end of a ball of wool, but you're still in the middle of working a piece?  There are lots of ways of joining the ends of a new ball into your work; my favoured method used to be the 'leave the dud end on the wrongside and pick up the new thread like nothing happened' method.  Then you knot the loose ends together and skim them in at the end.

This is inferior!  Now that I have my felting needle and mat, I can do this - all without getting up from my armchair:


Just stab until melded.  You'll have one or two fatso stitches on your rightside, but who likes skimming in ends?  Nobody.  Who likes stabbing fluffy things?   Ok, rhetorical....

Tuesday, 4 December 2012

Needle Felted Bunnies (Twee and Rock)


Since I discovered needle felting, the most Simple and adorably fluffy craft ever, I've been compulsively making stuff until I ran out of wool.  This included a pair of bunnies, one of whom has a little guinea-pig friend, as presents for the adorable twee- and rock- bunny-loving people in my life this festive season.  Follow the pics for a simple-as step-by step!


Thursday, 29 November 2012

Needle felting Christmas decorations

My fluffy little creations!  Including Gay Pride Santa, who is fabulous.
Hooray! It is the first Christmas post of this year, and I have discovered a new craft!  And it's the Simplest yet!

NEEDLE FELTING.
Beginning the pomander, on sponge, with official needle

All you need is some sponge, one or four of the official felting needles, and the right fluffy wool (available relatively expensively, compared to knitting wool) on the internet in various places and many many colours.  (P.S.  you can even use cat hair.  Seriously, google it.)

THEN YOU STAB IT UNTIL IT LOOKS AWESOME.

Behold!

Adding more layers of colour is easy
GAY PRIDE SANTA!  PENGUIN!  BIRDIE!  MARY MOTHER OF JESUS!  A STAR! A POMANDER!

All of these lovely things are so easy to make it's not true - just wrap the wool into shape and stab it until it sticks.  The more you stab, the denser the material becomes and the less pliable.  You would not believe how small a tuft you need for making eyes or dots with - just a few hairs, seriously.

Base for Mary - body cylinder, white head and cloak
I am going to put threads on these beauties and give them to people as Christmas decorations, but you could make toys, a Nativity scene, beads, decorations for clothes and accessories, anything you want.  I love this craft.  It is the best thing.

Finished Mary, with arms, white 'hands' and yellow halo

I'm off to do some more...

Thursday, 22 November 2012

Aran Cardigan Progress


I've been raring through this pattern, after a few rookie errors with the left front the right front was easy.

Someone (who shall remain anonymous) slurred this blog recently by claiming that it is no longer quite devoted to 'simple' things.  I think they think that cable jumpers are complicated.  Allow me to disagree.  When I have finished this, I will show you these stitches, and you will see how amazingly simple knitting a jumper like this is compared to how it looks.  Admittedly, it does look pretty complicated and awesome.


Sunday, 11 November 2012

Aran Style Cardigan Pattern

Ravelry is a lovely thing - a knitting and crochet online community, where you can find thousands of free patterns.  I managed to find this one after I went looking for an aran jumper.  My favourite pair of cable jumpers which my mother made me are both fraying at the cuffs and being mothed at the seams.  I needed a replacement, and fast - faster than Mum could make me one and post it from 6000 miles away.


To (hopefully) avoid moth damage, this jumper is made using acrylic super-bulky wool, purchased as usual at Kemps Wool Shop (link in the sidebar).

As long as you have the dexterity to stop yourself dropping the stitches, cable knitting is an insanely easy way of making your knitting projects look super-professional and difficult looking, and creating chunky, funky patterns.  I'm very happy with the way the back of this turned out, and have started on the left front now.

I learned a number of new stitches from this pattern, and from the comments on it from the lady who designed it.  When I've finished the jumper I'll swatch up again and show you my favourites in detail.  For now - onward!