Pages

Showing posts with label pattern. Show all posts

Sunday, 3 March 2013

Needle Felted Dinosaur - Hadrosaur


Make your own duck-billed dinosaur! like this cheeky chappie based on the Parasaurolophus which my brother and I loved to make in our Jurassic Park PC game.

You Will Need:
felting needles and mat;
cuddly toy stuffing, thread;
Wool:
base colour
tummy and legs colour
two detail colours
black darning wool and wool needle, beads for eyes


Using a large puff of cuddly-toy stuffing, make a base.  Wrap white cotton thread around the fluff until it holds its shape.


Cover the base in a fine layer of base colour; add a long fat piece on one end for a tail


Make a wiggly neck and head and attach to the body


Tidy up underneath the neck so that there is no join visible between body and head, by over-felting a thin layer of base colour 


Roll leg colour into four cylinders - two big ones for back legs, two small ones for front legs.  Felt them onto the body.


Add a big waft of leg-colour to his tummy.


Make a head-crest out of a very thin cylinder of detail colour; felt the other, fluffy end down over the top of his face.


 Add more detail colour across the joins of his legs, to hide the join and strengthen it.  Make narrow stripes of accent colour to disguise this purpose.


Passing the thread through his head three times to secure the end, add a bead on each side of the head, slitted nostrils, and the mouth.  To make the mouth, pass the needle through to where you want to start, loop the mouth around the front of his head, and finish the stitch at the end of his mouth.  Now make two more stitches from the left and right ends to the centre of this large stitch to fix it in place.

Monday, 9 July 2012

Knitted Baby Jumper Pattern


I say pattern.  Really this jumper is an experiment and a mess and I have no idea if the proportions are correct for the average baby of whatever age.  I just wanted to make something nice for the boss' first grandchild, and a teeny jumper seemed like the way to go.  I would follow a pattern, but they all rely on specific gague and I utterly cannot be arsed to find the wool/needles to fit a gague when I have non-matching wool and needles waiting to be used.  So I made it up.
Use these patterns for the contrasting details.

I think modelled on the man's teddy it looks a bit like a biker jacket.  Hopefully on the real Baby Boss it will look just as cool but in a less odd way.  Colour was intentionally picked to be gender-neutral, as were the barbed spear/flower patterns on the borders and back.

Baby Jumper From Scratch
You Will Need: Needles 3.5mm, 2 colours of soft DK wool, at least 2 balls of your main colour; 3 small buttons, darning needle (with really large eye), scissors.

Back
Cast on 45 sts.
Row 1 purl.
Six rows of 5 knit 5 purl ribbing.
Knit in stocking stitch until 3 inches long.  Insert the large flower/toothy ethnic pattern in a sympathetic colour of the same kind of wool. Finish pattern and continue in plain stst until the whole thing is 7 inches long.


Round off with another six rows of 5 knit 5 purl ribbing.
Cast off.

Front - No Buttonholes
Cast on 25 sts.
Row 1 purl.
Six rows of 5 knit 5 purl ribbing.
3 rows of plain stocking stitch.
Follow the pattern below for the border in your contrasting colour.

Knit another 2 rows of stocking stitch.
Begin decrease rows: begin every knit row with a knit-2-together until you only have approximately 10 stitches.  Check for length against your back piece - the front should come up to the bottom of the ribbing.
Finish the front with 6 rows of 5 knit 5 purl ribbing.
Cast off.

Front - with Buttonholes

Cast on 25 sts.
Row 1 purl.
Two rows of knit 5 purl 5 ribbing.
Button row: knit 2, yarnover, knit two together, knit one, finish the ribbing as usual.
Three rows of ribbing.
Button row: stitch two stitches, yarnover, stitch two together, finish the row.
Two rows of stocking stitch.
Insert the pattern; in the third pattern row, add a further yarnover and decrease stitch two stitches in.
Just after the pattern, before you begin the decreases, add another yarnover and decrease stitch two stitches in.
Complete the decrease rows and ribbing to finish, with the two fronts the same length.
Cast off.

Sleeves x 2
Cast on 20 stitches.
5 rows of knit 1 purl 1 ribbing.
3 rows of stocking stitch.
Insert the pattern for the border.  In the sixth row of the border, increase 1 at both ends of the row.
*Knit five rows of stocking stitch, then increase the next row at each end.*  Continue this pattern until your sleeves are as long as the back is wide.

Assembly
Weave in any loose ends from the different colous on each piece, using the appropriate method for your needle.  Using as much of your cast-on and cast-off ends as possible, seam the long edges of the sleeves.  Join the top edge of each front to the back, and seam around the round edge of each sleeve.  Finish off by joining the back to the fronts, putting extra strong stitches in the armpits which go / \  - across the seams on every piece.  Sew on the buttons, using a thin strand untwisted from your main wool colour as thread so that the stitches are invisible and strong.  (I hadn't done the buttons when these photos were taken).  Do up the buttons and you're ready to hand it on!

Saturday, 12 May 2012

Cross-stitch sampler update

This is a long-running project of mine, which is actually progressing faster in some ways than I thought it would.  Having stopped at about here after running out of thread, and getting on with other projects like this, I've come back to my cross-stitch like an old friend for doing on lonely evenings in front of the telly.

The top two rows of leaves and deer are now finished, so I know exactly how wide my piece is going to be.  Unfortunately, it looks like becoming just a little too wide  - if I have to stitch right up to the edge of my cross-stitch material, I might have to put the edge of the fabric across the centre of my embroidery hoop, which makes for awkward loose stitches and fraying problems.  Thankfully I have a little ordinary fabric put by with which to make a broad 'working border'. 

This border probably won't make it to the final cut as it were; I intend to hem the work off, but either with more elegant fabric than this or invisibly.  Then it can be hung on poles or framed as an attractive (hopefully) bit of Art.  This is just to give me that little extra legroom as it were to work at the very edge of my cross-stitch fabric.

I know where the corners of my pattern will go; I also know where the centre should be now, at least vertically.  This means that I can start placing the names of my relatives accurately in the border and really making this project into a proper family tree.  I'm starting with my mother's parents, as I know Granny likes a bit of tapestry work herself and is very proud of her projects. 

A Top Tip:
Cross-stitches can be done half at a time all in a long row, like this: ////////// and back again \\\\\\\\;
Or you can do them one at a time, like this: X X X X X to get the same result.
The difference between these two methods is that with the first, you end up in the pattern where you started, and with the second, you progress across the pattern stitch by stitch.  The second also means that you may start each X in a different corner each time, as you cannot re-enter where you just finished. 
If your pattern is complex, involving a lot of spaces and jumps across other colours, you may wish to combine these two techniques judiciously in order to 'jump' between adjacent 'blocks' of the same colour.  I have found the brown border responds particularly well to the XXXX treatment when trying to count to the beginning of the next repeat.

Wednesday, 18 April 2012

Knitting A Dress In The Round: FINISH HIM

The above title is an allusion to 90s beat-em-up button masher Mortal Kombat, in case you were wondering.

Once you have reached up to two-three inches of your desired final length, stop doing the lace repeats and work three rows of knit stitches, knitting over the purled decrease-triangles (they were only purled to keep them visually separate from the lace).  On your fouth row, do a picot row: *knit1, yarnover, knit2tog*; then do another six rows of knit stitches, followed by another picot row; followed by another two rows of knit stitches.  Now cast off


Turn the work wrong-side out, and fold up the hem along the lowest row of picot holes.  Slip-stitch the hem into place with the last of your wool.  Weave in any dangly ends you can see using the TechKnitting tips to help you (they are AMAZINGly good).

Try on your dress right-side-out before blocking, to see which directions it needs to stretch and be moulded.   Bear in mind that the lace will expand downwards a good way when blocked, outwards too.

N.B. the increase/decrease diamond has flattened out
Now hand-wash your dress in warm water with delicates-washing soap.  Don't bash it about too much as we don't want to obscure all the holes in the lace by felting the wool (which makes it fluffy).  When you're bored, pull the dress into a long thick rope top-to-bottom and squeeze the water out from the bodice to the hem.  This helps to lengthen it and straighten the lace stitches.  Lay a towel over a large chair or sofa, and using as many pins as it takes to hold it down, stretch and shape it so that the picot rows stand out at the upper edge and the increase section is nice and flared.  Leave to dry naturally.

Meanwhile, choose your ribbon.  I am lucky enough to live and work just round the corner from VVRouleaux, a boutique which specialises in designer trimmings, ribbon and frills.  Strikingly-coloured ribbons can be a surprisingly cheap or expensive way to tart up a craft creation, depending on how difficult it is to make the ribbons in the first place.  As my dress is an ivory white, I had to choose carefully to get the right level of subtle 'accent' colour.  The light in my workroom is awful but the ribbon is grey/lavender.

When your dress is dry, attach a safety-pin to one end of your ribbon, and using the blunt 'head' end weave approx. 1 metre of ribbon through all of the picot holes at the top edge and under the bust.  Start at the centre, work your way round and cut leaving plenty of length for loosening the tension and for a bow.  Trim the ends with the traditional triangle to discourage fraying, or carefully roll the ends back on themselves and secure with a few tiny stitches.


Done!

Saturday, 17 March 2012

Knitting a Dress in the Round - Main Lace Pattern


Diagonal Lace 2
Here's a link to the lace pattern which I have been using for the body of my dress.  I realised that I personally would go much faster if I used right-leaning decreases (k2tog) rather than left-leaning ones (ssk) so have actually turned the pattern inside out.  If you'd like to do this:

1) Read the pattern 'backwards,' right-to-left when it's written out.
2) Remember that in an instruction '(yo, k1) twice' you will still be reading right to left, so actually (k1, yo) twice.
3) Substitute right-leaners for left leaners, and vice versa.  This is much easier when there's only one kind of decrease in your pattern - e.g. I simply replace every instance of 'ssk' with 'k2tog'.

Here's a further link to the TECHKnitting post where I checked that this would work!  Scroll to the last comments.

Knitting Lace in the Round

It can be done - it just takes a little thought.
When reading your pattern,   if stitches are marked off for the beginning and end of rows - leave them out.  Just do the main lace repeat section for each row all the way round.  E.g. in my pattern, I do not knit 1 at the end and beginning of each row as described.

The lace pattern which I'm using uses multiples of 9 stitches: to create the pattern shown needs a minimum band of nine stitches wide and 36 rows long.  You must knit to get the correct measurement for you according to your gague - if your eventual under-bust stitch-count is not a multiple of 9, fear not.  Start each row with the lace repeat, and at the end of the row knit any stitches which won't fit.  Since the beginning and end of the row is at the back of the garment, this will leave a long strip of plain stockinette down the back which can be decorated with false-pearl buttons as a feature of the dress.

Knitting the Torso

After your decrease rows, do another 2 rows of plain knit stitches, then another picot row - *k1, yo, k2tog*.  Finish this feature with another two rows of plain knit stitches; as you go, remove all of your stitch counters except that which reminds you where the beginning of the round is.  

Measure your torso down to where your hips start to flare out, from your bustline to under your bellybutton.  Follow the lace pattern (plus knitting any odd stitches at the end) until you have the correct length. 

Next I will work out and blog how to flare the skirt gracefully, and choose a different lace or fringe for the hem.  See you soon!


Thursday, 15 March 2012

Knitting A Dress In The Round: Lower Bodice

The decreasing section of this dress is more fiddly, as I decided I wanted to have darts down under the busts for subtle(ish) shaping.

The diagram (hooray feeble MS Painting) on the right represents your finished frock.

Dotted lines = picot rows.  Note the under-bust picot row after the decrease rows.

Strong black lines show the direction of increases and decreases.  Measure yourself along the long red line before beginning your decrease rows.

Measure the length generated by your increase rows (short red line).  This will be mirrored by your decrease rows.  If between them they do not add up to the length of the bodice total, you will need to add an appropriate number of plain knit rows between increasing and decreasing (as shown on diagrams).

To locate your darts, measure the distance between the centre of your chest and one of your *ahem* most pointy areas.  Using your gague (stitches per inch), count back an appropriate number of stitches from the centre of your garment and place another stitch marker.  Mirror this pattern to find the beginning of your second dart on the other side of the garment.  As the distances will vary, stitches between the darts are not marked on the chart.

The chart below should be followed from RIGHT TO LEFT and includes a pattern for the increase rows.


Tuesday, 13 March 2012

Knitting a Dress in the Round: Upper Bodice

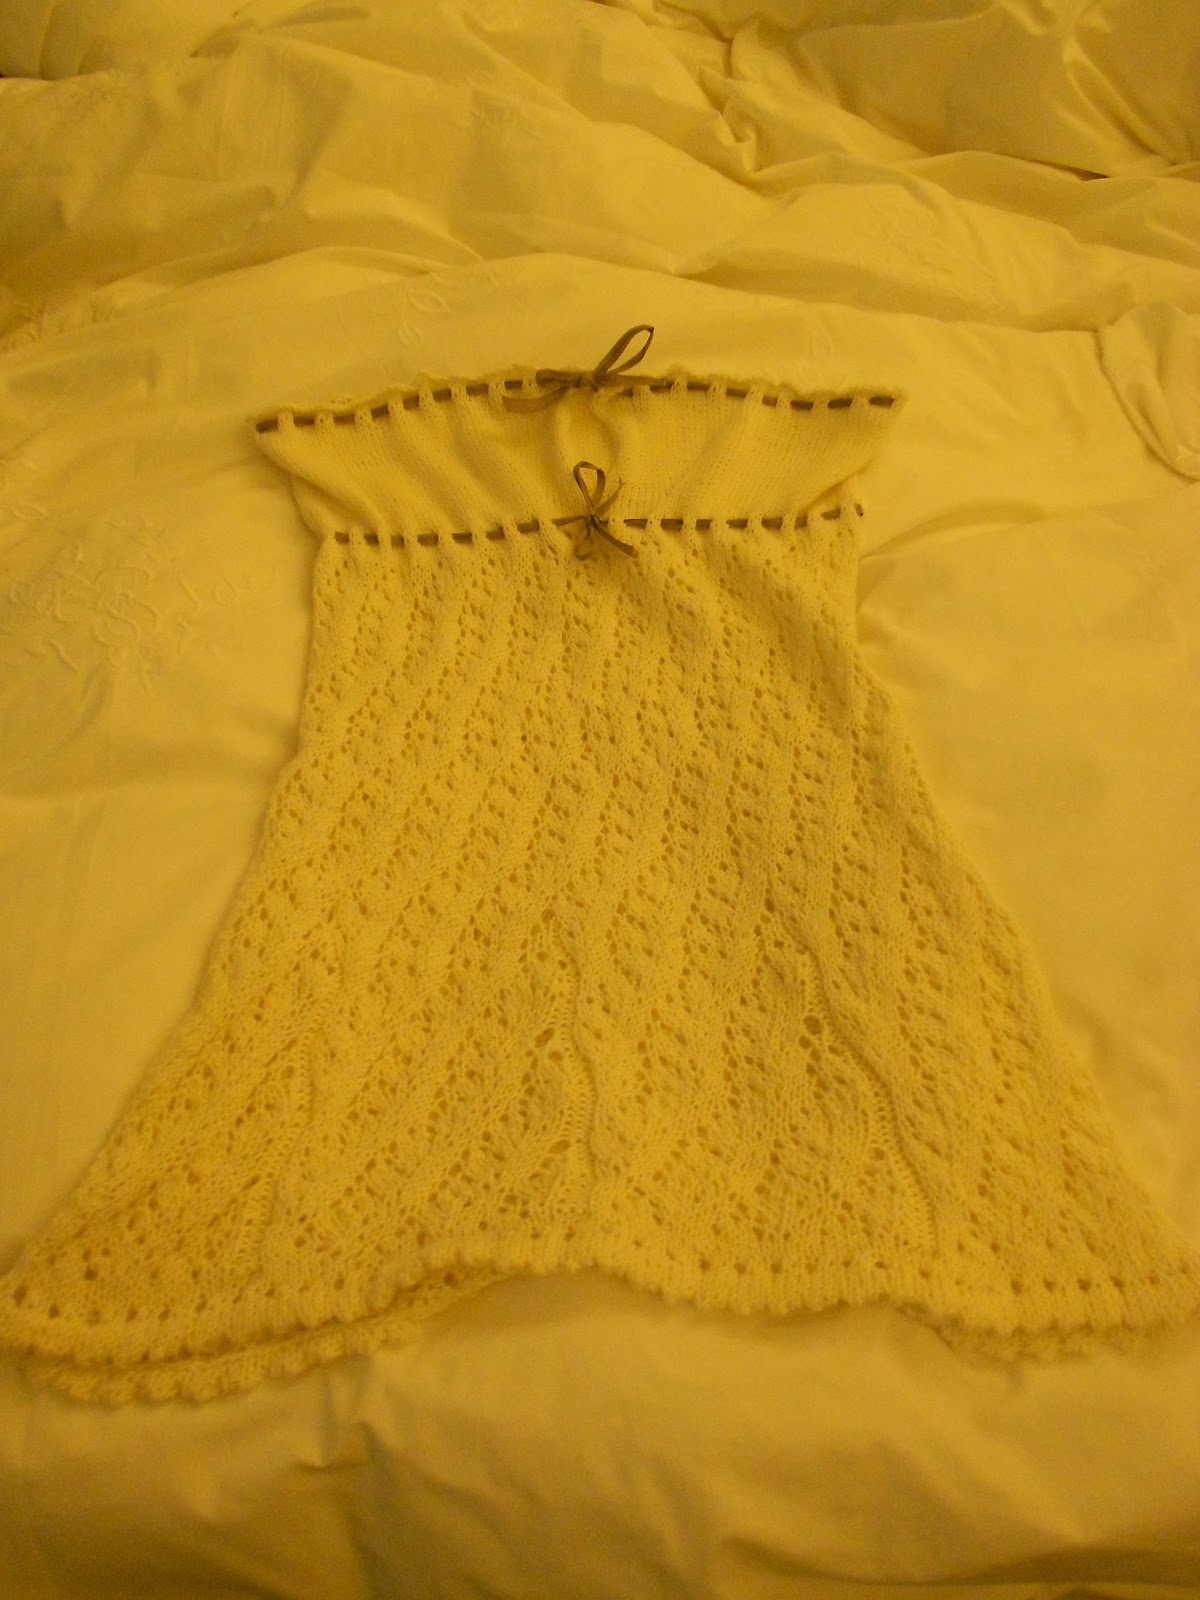
N.B: the working edge is nearer the bottom of the garment, so this  is 'upside down'

After all my protestations of feebleness after (barely) knitting the Hurricane Hat, I've begun to knit a dress in the round.  My logic was as follows:
1) a dress is just a very wide tube with sleeves.
2) some dresses do without sleeves, making them even more of a tube.
3) My mother just showed me how to do a 'picot hem', which produces an even row of holes all the way across/around a garment.
4) A picot hem makes an excellent way of threading colourful ribbon around an edge, to gather and tighten a garment at the bustline or waist.
5) If I measure myself, and work out where to increase and decrease at the right points, I could make a widening and narrowing tube which gathers ribbon-taut around ma bazongas.  This would be impressive, and warm.
6) If I did the lower half in lace, it would be less warm and less stuffed-caterpillar-looking, and have more give in the fabric to get a good fit.
7) TO KEMPS!

I have never swatched so much as I have swatched to design this project.  Swatching is when you make a little square of fabric with your chosen wool on your chosen needles, and measure how many stitches per inch you come out with.  This is your gague.  If it's too many compared to your pattern or the count on your ball of wool, you need bigger needles; too few, smaller.  I also used my swatches to test different kinds of increase and decrease out, trying to find the most appealing.  The incredible TechKnitting blog (linked at the sidebar) has been an invaluable help with this.  I recommend you follow it, for the diagrams alone.

Picot and Lace Knitted Dress - Upper Bodice

To generate my dress, I swatched out my white fingering-weight yarn on 3.5mm needles.  I measured myself at key points (vital statistics etc.) in inches, then multiplied those numbers by my gague to find my cast-on number, and targets for increasing and decreasing to.

The first part of the project is the picot hem.  Cast on as above according to your (measurement under the armpit x gague), adding stitch-markers every 20 stitches.  Knit round 3 rows.  On the fourth row,

*knit 1, yarnover, knit two together* - repeat between the ** until you reach the end of the row, and knit any remaining stitches.

Showing two lines of 'picot' and the increased and decreased central diamond

Identify the centre of your garment, opposite the beginning of the row.  Place a stitch-marker there as you knit your next row.
To identify the number of increase stitches you need, calculate the difference between your under-armpit and bust measurements.  Multiply this by your gague.  I came out with 2 inches, or 15 stitches, because I have no bust.
The increases form a triangle at the centre of the work:
1) knit; find marker; increase 1; knit;
2) knit; find marker; increase 1; knit 1; increase 1; knit;
3) knit; find marker; increase 1, knit 3; increase 1; knit;
4) knit; find marker; increase 1, knit 5, increase 1; knit;
5) knit; find marker; increase 1; knit 7; increase 1; knit;
6) knit; find marker; increase 1; knit 9; increase 1; knit;
7) knit; find marker; increase 1; knit 11; increase 1; knit;
8) knit; find marker; increase 1; knit 13; increase 1; knit
etc. for larger busts.

That's enough for now - I'll continue these posts as I work my way down the dress.  The decrease rows are a little more complicated.

Wednesday, 7 March 2012

Belted tunic dress


This isn't something I can really claim as my own, it's a New Look dress pattern (below) but the bead detail is mine.

It's made of the electric blue silk which the Man brought me back gosh, how long ago? many months... and I hadn't finished it yet because I suspected that turning the belt inside out would be an arse.  I reckoned without the smoothness of silk though, and in the end the fiddly little tie-ends were the biggest doddle of the whole project.

Look how blue!


Tuesday, 31 January 2012

Cross-stitch sampler: Inspiration and design


You Will Need: Inspiration, sharp pencil and ruler, graph paper (light grey is easier to 'read' than green), eraser, coloured pencils of many colours.

A friend who knows my love of Vikings and embroidery brought me a book of Icelandic tapestry motifs.  In combination with this background, I have a good, largely happy, large family.  Less and less unusually as trends continue, I have been blessed with a pair of amicably divorced blood parents and a pair of hugely amicable step-parents, balancing the books rather til my cup of responsible adult company runneth over.  For most of my young life I was able to visit all four of my grandparents, and only recently has this number decreased by one.  My younger brother is the apple of my eye, and a talented maker and doer of Simple things in his own right - notably odd DIY and fire-starting.

The first chapter of the book encourages you to make a sampler.  Traditionally often made to commemmorate a new marriage or a birth, I was inspired to design a rather monumental one in memory of my current family setup, which has served me so well.  I used further designs from later in the book to help me design the borders.

The central motif is Yggdrasil, the World Tree and everlasting Ash; it endures despite being nibbled by four deer, a goat and Ratatosk the squirrel.  Notice that the design of the leaves has four entry- and exit-points around the square, so that they can be rotated and joined onto each other and still look naturally growing without having to redesign every organic possibility.  The circular design allows the roundels to shelter the animals, who can nestle in without me having to design around them.

At Yggdrasil's roots are the Norns, who tend it; its roots draw water from three sources, which are echoed in the watery blue border; lurking underneath it is the dragon, who forms the outer ring of the design.

Hanging in its branches is Odin, undergoing his quest to gain ultimate knowledge; sheltering at its heart are Lif and Lifthrasir, Life and Striver-for-Live, the last human beings and the first human beings who will survive Ragnarok and repopulate the new world. Each of these scenes is designed independently, by first making a rough 'normal' sketch lightly in pencil and then 'pixellating' it manually until the desired effect is obtained.

The design is the Family Tree, and the names of the people most important to me will be embedded in the blue border using the alphabet design from the book.  I expect this piece will take me several years to complete, if I ever do, as the sheer number of stitches involved is immense and I am bound to make counting errors and have setbacks.  Nevertheless I intend to make a go of it alongside my other projects, coming back to it whenever I have nothing else going on, and leaving it out to reprimand me on my work-sofa whenever I come home.  I will have to start from one corner of my fabric rather than the centre (as recommended by the tapestry book) because I cannot know how big it will end up being, and want to join any more required fabric to an edge with a border for accuracy.

There is no reason for you to attempt such a ridiculously huge project of your own, but I do encourage you to design your own cross-stitch patterns on graph paper by pixellating sketches.  Fabric can be cheaply acquired in relatively large quantities from online supplier www.cross-stitch-centre.co.uk.  They are the Kemps Wool Shop of cross-stitch, or it looks that way to me.

Monday, 9 January 2012

Lace Knitting - Purl Two Together Through Back Loops

After finishing my first real piece of lacework, I wanted to have a go at a more complex pattern.  I eventually produced the following, which is probably the biggest test-swatch ever:

I'm probably going to send this to my mother to make into a kidney-warmer as she is always complaining of having cold kidneys.

For the pattern I had another quick look on Ravelry, didn't find anything I liked, then simply Googled 'leaf lace kntting' or something.  This pattern for a scarf looked lovely and claimed to be simple.  I can verify both!  Instead of casting on 39, I initially cast on 120, did a knit-3-purl-2 ribbing border to start, decreased one every twenty stitches, and then repeated the pattern across in three sets.  When I'd done nine sets in total I did another knit-3-purl-2 rib border, and cast off.  My holes are a lot bigger than others who have tried the pattern, as I am using the wrong size needles for my wool. 

Stiches learned in this pattern included two different kinds of decrease stitch.  The SKP (slip knit pass) or skpsso (slip, knit, pass slipped stitch over) speaks for itself; it's a mini cast-off essentially.  The p2tog tbl (purl two together through back loops) is more complex.  As I mentioned last post, it was my granny who showed me what the back of a stitch was, and now that I have my new camera I can show you!

This is the front of a stitch:

And this is the back:

To start a p2tog tbl, find the two back loops by turning the left needle round towards you and scooping up the backs right-to-left (purlwise).  Then purl them together as usual.

Casting on in large numbers without losing count, and making sure that I started each of my sets in the right place, was greatly helped by the use of these little stitch-markers.

Stitch Markers
You Will Need: Medium-sized beads with large holes, yarn of a contrasting colour to the working yarn, scissors

Pass the end of a bright yarn through the bead, and make a triple granny-knot across your index finger to preserve the loop.  To use, slip a marker onto the needle at a landmark point  or every 20 stitches when casting on.  As you come to them in your knitting, simply pass the marker from left needle to right and ignore them, carrying on with your pattern.  They will follow you up the work.  If they occur between two stitches to stitch together, pass the first stitch to your right needle, remove the marker, pass the first stitch back, make the k2tog or p2tog or whatever, and replace the marker on the right needle.

Wednesday, 4 January 2012

Knitting Reblog: Lace Bolero by Kelly Maher

For Christmas, among other things, I was sent a hank of wool from Routt County, Colorado by my mother.  It was so colourful, and so local to her area, that I wanted to make something entirely from it in one go to show it off, rather than do many mittens with it as she had intended.  A quick search on Ravelry turned up this pattern for a bolero or shrug - bolero is to cardigan as fingerless gloves are to normal gloves I reckon.

http://kellymaher.wordpress.com/2007/07/04/ribbed-lace-bolero/

It took a lot of blocking to get it not to stretch quite so hugely across my shoulders, but I'm satisfied with the effect; the blocking also made it felt a little, softening the fibres.  N.B. 'Blocking' is the process of making a piece the right shape, evening out the stitches and stopping all-stocking-stitch pieces from curling at the edges as they do naturally.  Hand-wash the knitting in warm, soapy water; rinse it out; squeeze out as much of the water as you can, then lay it on a towel on a flat surface.  Stretch, weigh down and/or pin as necessary into the correct shape, and allow to dry completely.

The lace pattern is particularly easy and beautiful, and I hope to learn more about how lace works as I do more projects.  Yarnovers, which create a single loop of wool and leave a hole in the finished article, puzzled me at first but my grandmother was able to show me what the 'back' of a stitch was.  Another useful skill gained from this pattern was the maths for working out inches-to-stitches - this was the first thing I've knitted where I bothered to do a 'swatch' first to work out my gague, but it was worth doing as my yarn was significantly thinner than recommended.  I think I could still probably have made it smaller, as is usual with my clothes, but we live and learn.

Skills I couldn't pick up included the mini-cable row to transition between the lace and second set of ribbing rows, so I just missed that out.  I also didn't switch back to smaller needles for the second rib set because I'd left them at my dad's place, but it doesn't seem to have made too much difference.

It's nice not to have a huge amount of wool left over from this project; with stuff so cheap at Kemps Wool Shop I always over-buy and end up with masses and masses hanging about.  No worries - one of these days I will be arsed to make a jumper out of my leftovers, and then I will probably not have enough.

N.B. Photography for this post, and hopefully all future posts, was taken by the boyfriend for me with my own cheapo point-and-click digital Nikon, so I can stop stealing things from google image results and abusing the photography skills and generosity of my stepmother now.    Look out for much more photo-ridden and hopefully more helpful posts in future, and I'll probably go back and update a couple of things from the archives as well!

Monday, 26 December 2011

Book Review: Cooking Without Recipes


For some reason, I got given a lot of cookbooks yesterday.  Do you think that maybe people might be under the impression that I like cooking?

One of them was this.  My mother's note with it said 'saw this and thought of you' - and she was so right.    This book says what I have been saying for many years - that recipes are all very well, but that they are only a guideline.  Except when baking, you can usually just ask Nigella what she thinks chestnuts are for and just wing it.  Even when baking, start with a basic sponge mix at 180 and whatever else you put in it (except too much liquid) can't go far wrong.

Structure
The book starts nicely with a bit of family background, with the author talking about his aged, widower father finally learning to cook all the dishes he loved best.  It's a bittersweet tale as father dies before he achieves his goal of effortless cooking, but it's a lovely example of the 'if so-and-so can, then you can' school of encouragement from food writers.  Delia tries it with herself but I don't know if any of us believe her.

Moving on, he describes the basic tools needed for decent cooking - big pan, frying pan, pestle and mortar. Not much else.  The pestle and mortar is a very nice touch, non-obvious and an encouragement to get mashing unusual flavours.  No-one uses enough marinades and rubs in this country.  The big pan is the Etch-A-Sketch of the kitchen - create anything you like by twisting the gas knobs, and if it goes wrong just shake it all up and make soup.  Soup is Mr Dundas' fallback cock-up dish, which is again a philosophy I can get behind.  What happens to cocked-up soup however remains a mystery.

Then he goes into the main description of what sort of cooking you might try with various ingredients.  They're divided very roughly into meat, fish, veg, nuts and seeds etc. and there are some great suggestions for combos (eg. seafood and vermouth) and basic sauces with which to experiment.

Influences and flavours
There is a lot of French in this book I think, but then I was never quite sure what 'French' cooking was as a child.  To me, using a lot of garlic and herbs became second nature watching my parents, so I never made the distinction between French and British.  The big 5 flavours in this book are virgin olive oil, garlic, salt, peppercorns of various colours and lemons.  Not unfamiliar to many I hope.  I've already vowed to have more lemons in my kitchen when I get one of really my own, partly because the Man and I drink a lot of G&Ts and partly because Dundas is right - they are a very versatile flavour.

Suggestions, Hints and Tips
The biggest tip in the book, most repeated and consistent is 'look at the food.'  Look at it, poke it, prod it, smell it, know it, and start to work out what it is for.  Is it a crunchy thing, an oily thing, a gamey thing, a slow-cook or fast-cook thing?  Then you can start to mix and match it with other things.  He gives some guidance on meats, and how to get the best out of them; a couple of not-really-recipes along the way like 'squash whole tomatoes into the English Breakfast pan so that they explode tomato over everything else' (I'm paraphrasing).  Generally though you are left to make up your own mind, mistakes and -along the way -cock-up soup.  There is also the usual (nowadays) tiresome evangelisation of local shops and farmers markets etc, which we all know we should shop at more but won't.  I forgive him.

Writing
I forgive everything because the writing is so very lovely.  Pretty unsubtly Significant Othered (the mention of the many men in his life comes early in the intro) Dundas is constantly referencing how good it will be to cook for friends -or a lover.  Favourite turn of phrase about the necessity of lemons -'Being ill without hot toddy with lemon and Scotch whisky is like being in love without Champagne.'  Possible, but not nearly as nice.  Brilliant.  Unlike my other favourite gay cook, Nigel Slater (who Dundas is also justly fond of), his writing evokes not the simple, tasty but rather lonely supper for one man and his food but the joyous shared experiment.  There is a 'we're all in this together' about the whole book.  None of Nigel's small, perfect, seasonal portions here - it's all bold, random, hearty and 'whatever you fancy'.

Verdict
I recommend that everyone read this book.  It's great inspiration for even the most established foodie, and the best call-to-arms I could think of for anyone who's just trying to make it on their own.  Dundas and I share the despair at the cook-by-numbers, Delia generation who have no idea how food actually works, just do as they're told until it comes out 'like it should.'  Shake off the shackles of How To Cook, and pick up Cooking Without Recipes.  Then put it down, buy a pestle and mortar, pour yourself a G&T and wait for inspiration to strike.

Tuesday, 13 December 2011

Knitting Reblog: Hurricane Hat by Andrea Goutier

It's great to be knitting again after a while, and now that I've booked the flights to go and see my mother in the Colorado Rockies it seemed only fitting to start myself a skiing hat.  A quick search on Ravelry turned up this lovely pattern by Andrea Goutier
: http://stringinmotion.blogspot.com/2008/04/hurricane-hat-copyright-sunshineknits.html


I have to admit that mine has not got the lovely swirls on it much at all - I was convinced I had misaligned my purl stitches for the first two inches, and then decided to abandon the decoration and do all knit stitches for speed as I needed my earwarmth quickly!  But looking at it now, the swirls are putatively visible and I'm sure you can make them work.

I am in awe of this lady for being able to think up a pattern in the round.  One day I hope to be a much better designer than I am, but in the meantime borrowing the genius of others to create necessary warmth will do.

I've also been following the blog Dances With Wool on Blogger, which is a beautifully written diary from a lady in Finland.  Her Advent posts, counting down the few hours of daylight in the harsh Arctic December, are particularly touching.


Sunday, 11 December 2011

Gingerbread Stave Church


If you made the gingerbread house from last post, and fancy knocking things up a notch, why not put another couple of layers and some chocolate fingers on it and make a small stave church?  It's the perfect mix of Jesus and Vikings for the Christmas season, and you can even destroy it like a marauding pagan later.

Gingerbread (well, Pepparkakor) Stave Church
You Will Need:
Remaining pepparkakor dough; ruler, pencil, squared paper, scissors; greaseproof paper, baking trays, rolling pin; royal icing; dinner knife; small bowl, small amount of dark chocolate; 2-3 packets dark chocolate Cadbury's biscuit fingers; cake decorations of choice. 

1) Using your house pattern as a template, draw out another wall/roof layer, a tower and a pointed steeple onto squared paper, each about 3cm high.  The second layer should start about 4cm from the eaves of the first.
2) Retrieve your remaining dough, and roll it out to 3mm thick.  Cut out two of each wall, gable and roof, and four triangular steeple-pieces.  With the remaining scraps, make dragons, crosses and a weathercock to stick to the roof.
3) Make a batch of royal icing using 1 egg white and 8oz of icing sugar, and/or use any remaining from making the gingerbread house.
4) Stick the gable pieces to the roof of the house.  Add Wall 2 between the gables on each side, using skewers to prop up the bottom edge.  Allow to set for a good while before attempting Roof 2.  Glue everything together well with icing.  Allow to set.
5) Add the tower pieces to Roof 2. Complete with the steeple pieces.
6) While the steeple is setting, melt a little chocolate in a small bowl in the microwave on a low setting.  Use the chocolate to stick chocolate fingers to the large gable ends and walls of the church. Leave some space on one end for a door.
7) Spread more icing on the roof, and use to stick Shreddies, flaked almonds, jelly diamonds or other small tile-like sweetnesses on.  I only did a row per roof as I ran out of icing, but may do more later.  This is a good point to involve any small children you may have hanging about.
8) When you have finished decorating the walls and roof, add the dragons to each corner, crosses to each end, and weathercock on top of the steeple: Break the pointy end off a skewer to roughly the height of the triangular steeple, plus 2cm.  Insert the pointy end into the edge of the weathercock carefully, supporting with icing if necessary.  Post the blunt end through the top of the steeple, to rest on the top edge of Roof 2 inside the tower. 

9) Place the church in its final resting-place, and sift icing-sugar snow over the top if desired.  I did this to mine at the last minute before Christmas to prevent icing sugar getting everywhere in the meantime.