Pages

Showing posts with label sewing. Show all posts

Tuesday, 23 October 2012

Cross-stitch update


As you can see, with little else to do I have been getting on with my cross-stitch.  The brown border does look a little overpowering, but hopefully I can fill out the tree itself a few more bits and pieces and make the main pattern more eye-catching later.


The little animals in the branches have been coming off well; I am particularly pleased with the squirrel.

I also wanted to share with the Internet the following amusing photo of some fried eggs, which I thought rather resembled Edvard Munch's The Scream.

 That's all; it has been quiet on the crafty front the last month while I've been filling in forms and so on in my spare time, but I'm looking forward to the Man's birthday cake this week which should be gracing these pages soon.  Not to mention I have just ordered some more wool from Kemps with which to make my first proper jumper - an aran cardigan to replace the well-worn and over-mothed ones which my mother made me years ago, whose sleeves are suffering.


Saturday, 12 May 2012

Cross-stitch sampler update

This is a long-running project of mine, which is actually progressing faster in some ways than I thought it would.  Having stopped at about here after running out of thread, and getting on with other projects like this, I've come back to my cross-stitch like an old friend for doing on lonely evenings in front of the telly.

The top two rows of leaves and deer are now finished, so I know exactly how wide my piece is going to be.  Unfortunately, it looks like becoming just a little too wide  - if I have to stitch right up to the edge of my cross-stitch material, I might have to put the edge of the fabric across the centre of my embroidery hoop, which makes for awkward loose stitches and fraying problems.  Thankfully I have a little ordinary fabric put by with which to make a broad 'working border'. 

This border probably won't make it to the final cut as it were; I intend to hem the work off, but either with more elegant fabric than this or invisibly.  Then it can be hung on poles or framed as an attractive (hopefully) bit of Art.  This is just to give me that little extra legroom as it were to work at the very edge of my cross-stitch fabric.

I know where the corners of my pattern will go; I also know where the centre should be now, at least vertically.  This means that I can start placing the names of my relatives accurately in the border and really making this project into a proper family tree.  I'm starting with my mother's parents, as I know Granny likes a bit of tapestry work herself and is very proud of her projects. 

A Top Tip:
Cross-stitches can be done half at a time all in a long row, like this: ////////// and back again \\\\\\\\;
Or you can do them one at a time, like this: X X X X X to get the same result.
The difference between these two methods is that with the first, you end up in the pattern where you started, and with the second, you progress across the pattern stitch by stitch.  The second also means that you may start each X in a different corner each time, as you cannot re-enter where you just finished. 
If your pattern is complex, involving a lot of spaces and jumps across other colours, you may wish to combine these two techniques judiciously in order to 'jump' between adjacent 'blocks' of the same colour.  I have found the brown border responds particularly well to the XXXX treatment when trying to count to the beginning of the next repeat.

Wednesday, 7 March 2012

Belted tunic dress


This isn't something I can really claim as my own, it's a New Look dress pattern (below) but the bead detail is mine.

It's made of the electric blue silk which the Man brought me back gosh, how long ago? many months... and I hadn't finished it yet because I suspected that turning the belt inside out would be an arse.  I reckoned without the smoothness of silk though, and in the end the fiddly little tie-ends were the biggest doddle of the whole project.

Look how blue!


Sunday, 26 February 2012

Cross-stitch sampler update


I managed to injure my leg while skiing at my mother's recently (all better now thank goodness) and was laid up for a couple of days.  This proved an excellent opportunity to get on with my sampler, which I had brought with me as a pastime for the long winter evenings.

The borders as you can see are taking shape.  I worked inwards from the corner to find the first leaf-point; now I will work right along the top of the tree until I know how wide the piece should be, and then go back and finish the blue border.  I think that my mother's parents' names will be enclosed at the top edge.

I am actually now further along than shown in the photo, with one stag-roundel finished and another begun; there will be four in total.  Stitch-counting in the red and brown border has been a problem, and one section got messed up a bit - but the long diagonals which you can see beginning at the bottom left of the piece provide a good place to restart and set things on the right path again.  This is the joy of working in independent sections - as long as the corner is OK, the tree and its surroundings can't affect each other.

I also hemmed the cross-stitch fabric crudely all the way round, to stop it from shedding fibres everywhere.  The trouble with bought squares of it is that the edges are never quite square to the weave, so there are short lengths which peel off the sides all the time.  Hem yours before you start is my advice now - just a simple fold over and running stitch all the way round.

Also at my mother's I found the goldfinch which I embroidered ages ago; I sent it as a birthday present the year I made it.  And at my father's this weekend I found the flower-press and pressed-flower pictures which I made of the remnants of my childhood garden.  I've added new, decently-lit pictures of these to the appropriate posts, so do go back and remind yourself of those Simple Things of yesteryear.  I do love my new digital camera!

Tuesday, 31 January 2012

Cross-stitch sampler: Inspiration and design


You Will Need: Inspiration, sharp pencil and ruler, graph paper (light grey is easier to 'read' than green), eraser, coloured pencils of many colours.

A friend who knows my love of Vikings and embroidery brought me a book of Icelandic tapestry motifs.  In combination with this background, I have a good, largely happy, large family.  Less and less unusually as trends continue, I have been blessed with a pair of amicably divorced blood parents and a pair of hugely amicable step-parents, balancing the books rather til my cup of responsible adult company runneth over.  For most of my young life I was able to visit all four of my grandparents, and only recently has this number decreased by one.  My younger brother is the apple of my eye, and a talented maker and doer of Simple things in his own right - notably odd DIY and fire-starting.

The first chapter of the book encourages you to make a sampler.  Traditionally often made to commemmorate a new marriage or a birth, I was inspired to design a rather monumental one in memory of my current family setup, which has served me so well.  I used further designs from later in the book to help me design the borders.

The central motif is Yggdrasil, the World Tree and everlasting Ash; it endures despite being nibbled by four deer, a goat and Ratatosk the squirrel.  Notice that the design of the leaves has four entry- and exit-points around the square, so that they can be rotated and joined onto each other and still look naturally growing without having to redesign every organic possibility.  The circular design allows the roundels to shelter the animals, who can nestle in without me having to design around them.

At Yggdrasil's roots are the Norns, who tend it; its roots draw water from three sources, which are echoed in the watery blue border; lurking underneath it is the dragon, who forms the outer ring of the design.

Hanging in its branches is Odin, undergoing his quest to gain ultimate knowledge; sheltering at its heart are Lif and Lifthrasir, Life and Striver-for-Live, the last human beings and the first human beings who will survive Ragnarok and repopulate the new world. Each of these scenes is designed independently, by first making a rough 'normal' sketch lightly in pencil and then 'pixellating' it manually until the desired effect is obtained.

The design is the Family Tree, and the names of the people most important to me will be embedded in the blue border using the alphabet design from the book.  I expect this piece will take me several years to complete, if I ever do, as the sheer number of stitches involved is immense and I am bound to make counting errors and have setbacks.  Nevertheless I intend to make a go of it alongside my other projects, coming back to it whenever I have nothing else going on, and leaving it out to reprimand me on my work-sofa whenever I come home.  I will have to start from one corner of my fabric rather than the centre (as recommended by the tapestry book) because I cannot know how big it will end up being, and want to join any more required fabric to an edge with a border for accuracy.

There is no reason for you to attempt such a ridiculously huge project of your own, but I do encourage you to design your own cross-stitch patterns on graph paper by pixellating sketches.  Fabric can be cheaply acquired in relatively large quantities from online supplier www.cross-stitch-centre.co.uk.  They are the Kemps Wool Shop of cross-stitch, or it looks that way to me.

Sunday, 31 July 2011

Bead work


In my last post, I spoke of the difficulty of finding suitable electric-blue thread for dressmaking.  Thankfully I finally found the funds and the time to have a proper search, and once reunited with my trusty Viscount was able to make a tunic dress out of electric blue silk.  I'm hoping to wear it when the boyfriend gets back from holiday, so as to prove that I appreciate him going to to the trouble of buying the material.

Also to show appreciation of a present (Christmas I think, from parents this time) I incorporated some beadwork into the neckline of this dress.  It was such a simple design that it needed jazzing up, and beads (or sequins) make an excellent eye-catching detail when you're not confident of your embroidery.

First identify the area or edge which you wish to cover.  Measure the area or length with a measuring tape, and use this knowledge to identify either 1) how many beads you will need or 2) how far apart you should space the ones you have.  I had a good selection of large multicoloured, small white and small multicoloured beads, so I could make an interesting pattern.

It's a good idea to lay down different sizes or colours of beads in succession, so that if one set are badly misplaced you can unpick them without disturbing the others.  I laid the larger beads first.  Tie in the thread on the wrong side of the garment and pass the needle through to the front.  Thread a bead down the thread (you may need a very narrow needle for small beads).  Pass the needle back through near to the first hole, and pull tight.  Make two small stitches on the wrong side, just underneath the bead, crossing over each other.  This will firmly attach the bead.  Now pass the needle through in the next place along.

Laying down a row of widely spaced large coloured beads, with groups of three coloured-white-coloured small ones in between, made a lovely beach-pebble effect which really goes with the tropic blue material.  You can buy packets of beads in single or mixed colours, and I can recommend using the mixed colours all together in your pieces - they're grouped for a reason.  If you find that some beads don't fit over your narrowest needle, don't chuck them but put them apart from the others in a different pot so that you don't have the same trouble next time.

Wednesday, 13 July 2011

Difficult Things

More of a lifestyle post today.  I've been having trouble keeping up with the cpd23 Things course after starting work (yay jobness!), despite Thing 4 being Twitter, RSS feeds and something called 'Pushnote.'  All of these are tools to collect and recommend webpages to other people, and part of my job now is using Twitter to gently shove our merchandise at people through twitting relevant news items or trivia.  Despite the ease with which I've got into this, I've not set up my own account.  I tend to use the Facebook share option to spread things I find, as it allows me to target rather than spam 'followers.'

Thing 5 is 'Reflective Practise.'  The organisers recommend that participants consider what they've already done in the scheme, and how it has worked for them, in a slightly structured and calm way.  Not having kept my post count up, I've had plenty of time to do this.  So far, the most impactful 'Thing' has been brand-building, leading me to slightly merge my online presences.  But I've let blogging lapse- both here, and in the sense of looking at other people's.  I've not been converted to Twitter, despite using it every day.  Are me and the Internet just not cut out for each other?

We'll see how the other Things go down.  But for now, I'm finding it hard to find time to do Simple Things, let alone Professionally Developing things.  Where, for example, will I find the electric blue thread I need to make a tunic/dress with the electric blue Thai silk boyfriend bought me?  Do I need more bobbin reels?  Do I have the money? So much in #John Lewis, so little time...

Tuesday, 31 May 2011

Make your own Skirt


A little while ago, my grandmother let me go through her boxes and drawers of fabric scraps and odd lengths.  I found bags of useful and lovely stuff, one piece of which happened to be a stylish 70s print in orange, green and brown on white (yeah, 70s).  The piece also just happened to be long enough to wrap around my waist and reach my knees, so I devised a suitable and simple skirt pattern to produce on my mother's ancient and dependable Viscount machine.

Machine-sewing on one of these bastards, or the more famous Singer models like the pic, is (I find) much easier than using an electric model.  Turning the gears by hand rather than battling the over-sensitive electric throttles makes a pleasant noise; they are also sometimes easier to thread, as all the moving parts are left more visible.  Not least, you never have to send off to Korea for parts if the tension screw falls off, but can stop into the nice man in Wimbledon who will hand-make a new one.

Homemade Simple Skirt
You Will Need:
Cotton/similar fabric, approx. 50 x 24 inches (more for more-ish people, i am teensy)
Six or seven appropriate buttons
Strong cotton thread, one reel
Machine
Tailor's chalk
Pins
Flat surface
Measuring tape
Sewing scissors

1) First take your own measurements: hip, and waist-to-knee.  Now measure your piece of scrap fabric to make sure you have plenty.
2) Lay your fabric on the flat surface, and mark out the following pattern according to your measurements.
The shortest edges of the four-sided shapes are half your hip measurement (allowing 1/2 inch seams, in dark brown).  The longer edges opposite these and the vertical edges are taken from your waist-to-knee measurement.  Joining these should give you a nice slant.  The smaller, triangular shapes can be as long along the bottom as your remaining fabric will allow - remember though that they should be the same size, and do allow for seams.  They give the finished garment a bit of swish.
3) Cut out the pieces, allowing 1/2 inch seams all the way round each one.
4) Pin the pieces together.  Join each triangle to the two large pieces, slant-edge to slant-edge, straight-edge to straight-edge, wrong sides together.  Check for a good fit.  If you like, adjust the seams at the waistband to give a more tailored shape.
5) About 5 1/2 inches down the seam between one large piece and triangle, make a chalk mark.  Cut two little snips out of the seams at this point.  This is a stopping-point to make a gap for buttons.
6) Make sure that your machine is threaded properly by running a test piece of scrap through it a few times.  When satisfied, join all the pieces together, removing the pins as you go along.
7) When you come to your snips, stop sewing.  Rotate the fabric by putting the needle all the way through, lifting the presser foot, swizzling the fabric and replacing the foot.  Sew back over the seam to strengthen it about 2 inches.
8) Above the snips, stitch the 1/2 inches of seam back independently of each other, making a hemmed slit.  This will be where you place buttons and buttonholes later.
9) Stitch the waistband seam.  Cut any obvious corners off the bottom of the skirt, and hem to a rough circle. It's nice to open out the seams like the pages of a book and hem across them, so that they're flat.
10) With tailor's chalk, mark places for buttons equidistant along the slit on the wrong side.  Sew the buttons onto the right side.  Hold the other side of the slit fabric over the buttons, and mark on the right side with tailor's chalk where the holes should go.
11) Outline these chalk marks with circles of backstitch, about 2mm away from the mark on all sides.  Now go over these circles with closely-placed short stitches perpendicular to the backstitch.  It's a buttonhole!
12) Fold the buttonholes in half, so that you can cut a tiny snip inside them with your scissors more safely.  Lengthen out these snips carefully until they are the right size for buttons.

Fin!

Sunday, 14 November 2010

Patchwork Part 2: Grandmother's Flower Garden


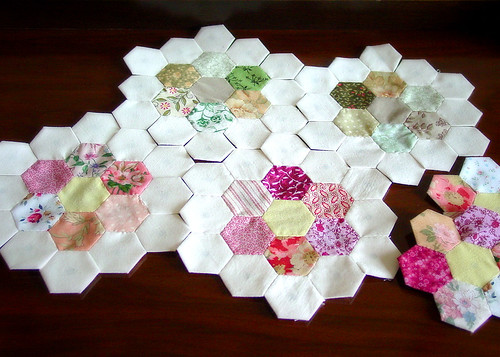
Last post, I told you how to make the basic hexagons which make up a traditional piece of patchwork.  of course you could make squares, or indeed any polygonal shape, or combine different shapes - as long as the results will tessellate.  Hexagons however have something elegant and professional-looking about them, and arranged into 'flowers' as you can see in the above picture make for beautifully organic designs.

'Grandmother's Flower Garden' is the name of the pattern being created above, but I don't have enough white or other single-colour fabric to form the edges of my flowers, so instead I'm just going to sew together the seven-hex shapes you can see on the right - just as Mum did for my quilt-cover.

Making 'Flowers'
You will need:
7 hexes, either different colours or 1 of one, 6 of another
Cotton thread in a complimentary colour for both kinds of hex (e.g. black and rust hexes, brown thread)
needle, obv

BEFORE YOU START: Remember the Rules of Sewing - never use a thread longer than your own arm, and don't panic if you get loops - they can be prevented by letting your needle dangle freely on the thread occasionally.

Hooray for the return of shoddy MS Paint diagrams!

1. Lay out your hexes as you would wish them to appear, right-side up.  This is important when dealing with some patterns and stripes (see fig. 6.)
2.  Taking the central hex, position the edge of your first outer hex against it and flip it down so that the right-sides (outsides if you were wearing it) are facing each other, with the seam you are about to sew uppermost.  Right sides, remember!
3.  Sew right-to-left along this edge.  Don't worry about the papers and tacking stitches, we'll deal with that when it's all finished.  Use the stitches shown in these videos.
4. The tricky bit.  Consulting your layout and the right-side of your work if necessary, position the next outer hex alongside the first one.  Sew the dotted blue line, where the solid blue line is the seam you've already completed.  Tie off.
5.  Rotate the work.  Repeat Fig. 3 for the second outer hex, and then add the third by sewing a 'radial' seam as in Fig. 4.  Continue until you come to the last radial seam, which will be the other side of the first hex you added.
6.  Especially with stripes you can create a nice symmetrical effect.  I find it easiest to do my seams in the order described, because it feels like it involves less tying-off and on again than my mother's method:

1. Attach all outer hexes to the inner hex in a continuous seam.
2. Complete all the radial seams in turn.

If you find the second one easier, then it all averages out in the end; the Mum way is probably easier for stripe-co-ordination for beginners.

Soon - the coat pattern!

Wednesday, 10 November 2010

Patchwork


I am the proud owner of a patchwork quilt-cover made by my mother.  Patchwork nowadays is a very old-fashioned hobby; it dates from the time when leftover fabric was a real resource to be saved, and when women needed things to do which were repetitive and occupied the creative parts of their brains to stop them from thinking things like 'perhaps I could leave the kitchen one day' and 'wouldn't it be nice to vote.'

Luckily for me English patchwork has never quite died, and now I can see the pattern of my early childhood laid out on my bed - from the silk and cotton shirts which Mum used to wear, to the stripy red and white of my primary school summer dresses, to the lining from Dad's old favourite coat.  I have also been left a hexagon template for making my own pieces, and seeing as I am now unemployed and lazing about the house with nothing to do, I have decided to create a patchwork housecoat - giving me something to do and a warm garment to laze about in.  I'll post the method or pattern for that when I get to that stage, but at the moment I'm still making hexagons, so I'll show you how to do that.

Making Hexagons
You Will Need:
Stiff paper or very thin card
Scissors for paper
Scissors for cloth (if you use the same scissors then they will become blunted and useless)
Bits of old dressmaking fabric, torn clothes, grown-out-of clothes (explore handing-me-down first)
Cotton thread in a bright colour
Plastic bag for scraps which inevitably result
Template

The last item is the most difficult to get hold of; every piece you make must have every side the same length to within about 2mm, so use a proper template such as can be printed off from here.  Using this template, cut out paper hexagons; you may be able to print the lines directly onto your paper.  I used my mother's metal hexagon as a stencil.

Cut out squares from your fabric pieces using your sewing scissors, so that there will be at least 1cm of seam allowance around your paper hexagons.  If you're cutting up a garment, cut swaths out from between the seams first, i.e. each side of a shirt as you would iron it, or opening out the legs of trousers; folding seams around the paper is awkward and makes for uneven hexes.  You could save or bin the resulting seamy scraps; if you saved them you'd be making a peg-rug, but I don't know how to do that and think that peg-rugs look like the seaweed mats which form in the oceans, so I binned them with joy.

Lay the paper hex on the wrong side of the cloth (the wrong side would be the 'inside' if you were wearing it) and fold  the fabric around the corners.  Using a single stitch at each corner, 'tack' the fabric to the paper as shown in these videos.  Leave an inch of thread tailing off the last stitch, cut the thread and begin another hex. Stack hexes by colour so that you know how many of each you have.

Once you've made all your hexagons you can decide how you want to sew them together.  Depending upon your commitment and level of extroversion, you can combine contrasting or complementary colours either in single hexes next to each other or as 'flowers' like the picture.  I went for the flower option, and I'll explain how to make those in my next post.