Pages

Tuesday 31 January 2012

Cross-stitch sampler: Inspiration and design


You Will Need: Inspiration, sharp pencil and ruler, graph paper (light grey is easier to 'read' than green), eraser, coloured pencils of many colours.

A friend who knows my love of Vikings and embroidery brought me a book of Icelandic tapestry motifs.  In combination with this background, I have a good, largely happy, large family.  Less and less unusually as trends continue, I have been blessed with a pair of amicably divorced blood parents and a pair of hugely amicable step-parents, balancing the books rather til my cup of responsible adult company runneth over.  For most of my young life I was able to visit all four of my grandparents, and only recently has this number decreased by one.  My younger brother is the apple of my eye, and a talented maker and doer of Simple things in his own right - notably odd DIY and fire-starting.

The first chapter of the book encourages you to make a sampler.  Traditionally often made to commemmorate a new marriage or a birth, I was inspired to design a rather monumental one in memory of my current family setup, which has served me so well.  I used further designs from later in the book to help me design the borders.

The central motif is Yggdrasil, the World Tree and everlasting Ash; it endures despite being nibbled by four deer, a goat and Ratatosk the squirrel.  Notice that the design of the leaves has four entry- and exit-points around the square, so that they can be rotated and joined onto each other and still look naturally growing without having to redesign every organic possibility.  The circular design allows the roundels to shelter the animals, who can nestle in without me having to design around them.

At Yggdrasil's roots are the Norns, who tend it; its roots draw water from three sources, which are echoed in the watery blue border; lurking underneath it is the dragon, who forms the outer ring of the design.

Hanging in its branches is Odin, undergoing his quest to gain ultimate knowledge; sheltering at its heart are Lif and Lifthrasir, Life and Striver-for-Live, the last human beings and the first human beings who will survive Ragnarok and repopulate the new world. Each of these scenes is designed independently, by first making a rough 'normal' sketch lightly in pencil and then 'pixellating' it manually until the desired effect is obtained.

The design is the Family Tree, and the names of the people most important to me will be embedded in the blue border using the alphabet design from the book.  I expect this piece will take me several years to complete, if I ever do, as the sheer number of stitches involved is immense and I am bound to make counting errors and have setbacks.  Nevertheless I intend to make a go of it alongside my other projects, coming back to it whenever I have nothing else going on, and leaving it out to reprimand me on my work-sofa whenever I come home.  I will have to start from one corner of my fabric rather than the centre (as recommended by the tapestry book) because I cannot know how big it will end up being, and want to join any more required fabric to an edge with a border for accuracy.

There is no reason for you to attempt such a ridiculously huge project of your own, but I do encourage you to design your own cross-stitch patterns on graph paper by pixellating sketches.  Fabric can be cheaply acquired in relatively large quantities from online supplier www.cross-stitch-centre.co.uk.  They are the Kemps Wool Shop of cross-stitch, or it looks that way to me.

Sunday 15 January 2012

Winter-flowering Cherry Cake / Black Forest Gateau

A friend (the owner of a promptu and excellent specialist liqueur business Alchemist Dreams) had a Winter Foods Party this weekend where everyone had to bring something comforting.  'You make very very tasty puddings,' she said (no word of a lie) so I decided to bring a cake.  At first I thought of Nigella's chocolate marmalade cake, which keeps forever and is very easy to construct indeed as it is all made in a big saucepan.  However although tasty and warming it is not exactly the most flamboyant thing in my repertoire, so as usual when entertainment is called for I decided to make something up.

The following would probably be called a Black Forest Gateau anywhere else.  The last time I tasted home-made BFG was when my mum made one for my brother's forest-themed 5th birthday party.  There was a lovely hand-drawn (by Mum) red squirrel on the invitaitions, and we played many traditional wolf-themed party games.  The cake was I think the most luxurious, foreign and sqodgy thing Mum ever made, and due perhaps to the faff never made it again that I recall. She did save one of the invites from great pride though (it was a brilliant squirrel).

Dark cherries have been at the front of my mind recently for a reason I can't recall, and so this cherry-chocolate concoction with vanilla creamy filling was inspired by Culinaria, Muse of Baking, rather than any one gateau recipe.  By happy chance the combination has already been tested by Germans everywhere for decades, so I couldn't go far wrong.


Winter Flowering Cherry Cake
You Will Need: 20-23cm Springform tin (baking paper and scissors if not non-stick); sharp knife and chopping board, small plate; large bowl, wooden spoon, scales; small saucepan, medium bowl; mug, whisk, fork, breadknife;  serving plates.

200g dark cooking chocolate
70g sugar
100g butter
6 eggs
2 tins pitted black cherries in syrup
100g self-raising flour
dried black cherries
300ml extra thick cream
1tsp vanilla essence

Cake
1) Preheat the oven to 180 degrees C.  If necessary, line your tin with baking paper and grease with a small amount of butter; set aside for later.
2) Take a block of chocolate smooth side up, the sharp knife and chopping board, and small plate.  Scrape the knife towards you gently over the flat surface of the chocolate block to make curls of chocolate.  Set these aside on the small plate and put in the fridge for later. 
3) Melt the remaining chocolate in the medium bowl over a pan quarter-full of boiling water.  Cut the butter into small chunks and add that.  Stir very very gently to melt.  Add the sugar and mix gently.
4) Take four of your eggs, and whisk them in the large bowl until well blended.  Slowly add the chocolate-butter mixture and whisk as you go until well mixed.  Drain the tinned cherries of their syrup; check for any which have been badly pitted, remove any stones and stir them whole into the mixture.  Gradually sprinkle in the flour and mix gently.
5) Pour the lot into the tin and bake at 180 degrees C for about 35 minutes, or to clean-skewer.
6) When the cake is ready, allow it to cool in the tin.  Remove from the tin when cool, and peel off any paper.  Flip the cake onto its serving plate.  When it is compeltely cooled, very gently saw the cake in half with a breadknife.  Shuffle the top half carefully onto another plate - don't try to pick it up, just pull an edge round until the halves separate and you can get the plate underneath the lip. 
Vanilla Filling
6) While the cake is cooling, make the vanilla filling.  Take your remaining two eggs.  Separate the yolks into a small bowl, and the whites into a mug or other container to use for something else (probably meringues).  Add a good heap of caster sugar to the egg yolks, about a tablespoonful, and the vanilla essence.  Beat with a fork.   Whisk in the cream a half at a time until stiff and smooth.
7) Spread the bottom half of the cake with half the vanilla cream.  Plop the other cake half on top gently (you may pick it up with both, widely-spread hands).  Add the rest of the cream to the top in a big central heap  and spread out with a dinner knife until it looks nice and even.
8) Sprinkle the top with the chocolate curls from the fridge.
 Cherry Blossoms
9) Take about 20 dried cherries.  Flatten them out on the board until round.  Make five cuts about 2mm long evenly around the edge of the circle.  Take the sections thus formed and pinch them apart and into points with your fingernails.  Add to the cake decoration.  Store the finished cake in the fridge until half an hour before serving.
10) Serve in 'ooh just a slither' sized pieces to the admiring throng (she said modestly).

Monday 9 January 2012

Lace Knitting - Purl Two Together Through Back Loops

After finishing my first real piece of lacework, I wanted to have a go at a more complex pattern.  I eventually produced the following, which is probably the biggest test-swatch ever:

I'm probably going to send this to my mother to make into a kidney-warmer as she is always complaining of having cold kidneys.

For the pattern I had another quick look on Ravelry, didn't find anything I liked, then simply Googled 'leaf lace kntting' or something.  This pattern for a scarf looked lovely and claimed to be simple.  I can verify both!  Instead of casting on 39, I initially cast on 120, did a knit-3-purl-2 ribbing border to start, decreased one every twenty stitches, and then repeated the pattern across in three sets.  When I'd done nine sets in total I did another knit-3-purl-2 rib border, and cast off.  My holes are a lot bigger than others who have tried the pattern, as I am using the wrong size needles for my wool. 

Stiches learned in this pattern included two different kinds of decrease stitch.  The SKP (slip knit pass) or skpsso (slip, knit, pass slipped stitch over) speaks for itself; it's a mini cast-off essentially.  The p2tog tbl (purl two together through back loops) is more complex.  As I mentioned last post, it was my granny who showed me what the back of a stitch was, and now that I have my new camera I can show you!

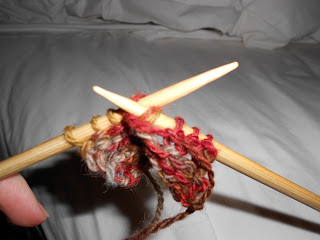
This is the front of a stitch:

And this is the back:

To start a p2tog tbl, find the two back loops by turning the left needle round towards you and scooping up the backs right-to-left (purlwise).  Then purl them together as usual.

Casting on in large numbers without losing count, and making sure that I started each of my sets in the right place, was greatly helped by the use of these little stitch-markers.

Stitch Markers
You Will Need: Medium-sized beads with large holes, yarn of a contrasting colour to the working yarn, scissors

Pass the end of a bright yarn through the bead, and make a triple granny-knot across your index finger to preserve the loop.  To use, slip a marker onto the needle at a landmark point  or every 20 stitches when casting on.  As you come to them in your knitting, simply pass the marker from left needle to right and ignore them, carrying on with your pattern.  They will follow you up the work.  If they occur between two stitches to stitch together, pass the first stitch to your right needle, remove the marker, pass the first stitch back, make the k2tog or p2tog or whatever, and replace the marker on the right needle.

Wednesday 4 January 2012

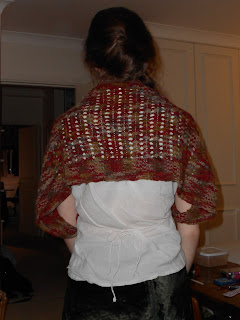
Knitting Reblog: Lace Bolero by Kelly Maher

For Christmas, among other things, I was sent a hank of wool from Routt County, Colorado by my mother.  It was so colourful, and so local to her area, that I wanted to make something entirely from it in one go to show it off, rather than do many mittens with it as she had intended.  A quick search on Ravelry turned up this pattern for a bolero or shrug - bolero is to cardigan as fingerless gloves are to normal gloves I reckon.

http://kellymaher.wordpress.com/2007/07/04/ribbed-lace-bolero/

It took a lot of blocking to get it not to stretch quite so hugely across my shoulders, but I'm satisfied with the effect; the blocking also made it felt a little, softening the fibres.  N.B. 'Blocking' is the process of making a piece the right shape, evening out the stitches and stopping all-stocking-stitch pieces from curling at the edges as they do naturally.  Hand-wash the knitting in warm, soapy water; rinse it out; squeeze out as much of the water as you can, then lay it on a towel on a flat surface.  Stretch, weigh down and/or pin as necessary into the correct shape, and allow to dry completely.

The lace pattern is particularly easy and beautiful, and I hope to learn more about how lace works as I do more projects.  Yarnovers, which create a single loop of wool and leave a hole in the finished article, puzzled me at first but my grandmother was able to show me what the 'back' of a stitch was.  Another useful skill gained from this pattern was the maths for working out inches-to-stitches - this was the first thing I've knitted where I bothered to do a 'swatch' first to work out my gague, but it was worth doing as my yarn was significantly thinner than recommended.  I think I could still probably have made it smaller, as is usual with my clothes, but we live and learn.

Skills I couldn't pick up included the mini-cable row to transition between the lace and second set of ribbing rows, so I just missed that out.  I also didn't switch back to smaller needles for the second rib set because I'd left them at my dad's place, but it doesn't seem to have made too much difference.

It's nice not to have a huge amount of wool left over from this project; with stuff so cheap at Kemps Wool Shop I always over-buy and end up with masses and masses hanging about.  No worries - one of these days I will be arsed to make a jumper out of my leftovers, and then I will probably not have enough.

N.B. Photography for this post, and hopefully all future posts, was taken by the boyfriend for me with my own cheapo point-and-click digital Nikon, so I can stop stealing things from google image results and abusing the photography skills and generosity of my stepmother now.    Look out for much more photo-ridden and hopefully more helpful posts in future, and I'll probably go back and update a couple of things from the archives as well!

Tuesday 3 January 2012

Horseradish

It takes some amount of work to turn these:


into this:
but somehow, over the New Year bank holiday, my man managed it.  Just occasionally he becomes obsessed with an idea, a Make or Do, in the same way that I will - and is determined to Make or Do it.  Advice will be sought from the internet, his mother, brother, and indeed all and sundry who wander into his line of sight, and he will panic about doing things 'properly'.  This is a man who will look up the 'correct' salad dressing for cucumber sandwiches.  The vagueness of advice available about dealing with horseradish did not perturb him for long, however.  Having once grasped the idea, and then the root, from his father's garden, and got said roots home, nothing would do but that homemade horseradish sauce was made. 

You will need a food processor of some sort.  Obviously in the old days this stuff had to be hand-grated, but even using the supergraters mentioned in my Orange Cake post this would take forever and be dangerously eye-watering.  He used his mother's Magimix to pulverise roughly chopped pieces of peeled root.

Having crumbed up your roots, you will need a saucepan and some creme fraiche.  At this point any mixture of the two will be either too mild or mouth-scrapingly hot; the best way we think to get the flavour correct is to very gently cook the mixture, taste-testing as you go.  Adding vinegar, a small amount of icing sugar and/or flour is also an option, although not one which I saw the application of in detail.  The key thing is correct flavour balanced with correct texture.

Once done the sauce will keep in the fridge for a few weeks, slowly getting milder and milder.  We've been eating it with cold cuts and smoked mackerel on toast.  Dyed green it's also a cheap substitute for wasabi.  Added to mustard it forms Tewksbury mustard.

Real horseradish is apparently very easy to grow in Britain; the leaves are also edible, although they have the typical popularity of tuber-top greens at the moment.  The boy's second rapidly-grasped idea was to grow our own, although he would have to indulge in some guerilla colonisation of his mother's garden to make this happen.  Maybe one day ... but for now, another seasonal jarred thing to Make and Do has been created which I'm sure will become a traditional part of our culinary year.