Pages

Monday 29 November 2010

Pepparkakor


The first of what I think will be many Christmas posts.  So much of what makes Christmas Christmas is food-related, and every family has their own traditions.  We liked to have fancy croissants and pain au chocolat for breakfast on the day, lunch was poached eggs with hollandaise sauce, and dinner was usually duck or goose (turkey is abominable done badly and presents far too many leftovers problems.)  The nibblies that surrounded these meals were however just as important and included nuts in the shell, biscuits from a tin and Christmas cake - the sort that keeps until February.
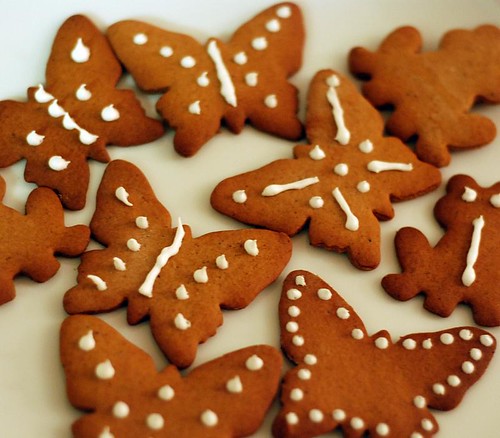
Since my father's fiancĂ© N moved in however we have developed a slightly different 'feel' to our Christmas, with different food reflecting the changes and additions to the family.  N brought the idea of Pepparkakor to the household, as she had sampled them when visiting friends from Sweden.  They're a little like gingerbread biscuits, but incorporate other spices and flavours as well as being a bit crunchier than English gingerbread.  With a hole in the top for a ribbon and  cut into decorative shapes they can be hung on the tree.

I tend not to do the same Christmas cake as my mother used to (and I presume still does) any more, because living with Dad who doesn't like the icing makes it a bit of a chore to eat all by myself.  Instead I have substituted Nigella Lawson's Certosino recipe, which I seem to remember she admits to stealing from an Italian friend.  I will therefore reproduce it here later at an appropriate moment; it contains spices and dried fruit so is perfectly seasonal.

Pepparkakor


You Will Need: Large bowl, small bowl, wooden spoon, coffee cup (to measure; about the size of an American 'cup'), happy-shaped biscuit cutters, baking tray and greaseproof paper, cling-film, dinner knife, fork, teaspoon, tablespoon, grater, thin ribbon if using

8 ounces unsalted butter
1 1/2 cups caster sugar
1 tablespoonful maple syrup
1 egg
3 1/2 cups plain flour
2 tsp baking soda

2 tsp cinnamon
2 tsp ground ginger
2 tsp ground cloves
splash of orange juice
2 tsp orange zest

1. Cut the butter into little cubes.  Cream the butter and sugar, add the maple syrup and mix.
2. Beat the egg with the fork and incorporate into the butter mix.  
3.  Add the flour, spices, orange zest (grate a bit off the skin until you can see the white showing through, using the small cheesy holes (the diamond-shaped punctures make too much mess)) orange juice and baking soda.  
4. Knead into a stiff dough, adding more flour if need be until the whole mass will come away from the sides of the bowl.
5.  Take the dough out of the bowl, wrap in clingfilm and chill in the fridge for 2 hours.
6. Preaheat the oven to 175 degrees C.  Line the baking tray with greaseproof paper and put aside.
7.  After 2 hours remove the clingfilm, lay the dough out on a floured surface and roll out with a floured rolling pin with floury hands until it's about 1/8th of an inch thick.  
8.  Cut the dough into shapes, making a hole in each one with the point of the knife for the ribbon; remember that the biscuits will expand as they cook so make the hole relatively big.  Transfer finished shapes to the baking tray and re-roll leftover dough until there is none left.  (if you have a teeny bit left, squidge it into an impromptu heart or circle shape and bake it anyway ;P )
9. Bake for 7-10 minutes.  When browned, transfer to a cooling rack.  When completely cool they can be ribboned, hung or scoffed!

In writing the 'You Will Need' for this post I've reflected once again that making a cake is like laying a table setting for one very hungry soup-eating giant, who needs a fork for some reason and takes sugar in his coffee.  All baking seems to require at least 3 kinds of spoon.  It's probably a law.

Wednesday 24 November 2010

Go back in time with a tin

No, I don't mean that you should make a time-capsule and bury it in your garden, although that is also a Simple Thing To Make And Do - what I meant was that it's easy to cheer oneself up with a treat from one's childhood, and so often these things come in tins.
No, I don't mean that you should raid your store-cupboards for Best Before 1987!  Are you sitting comfortably?  Then I shall explain...

Recently on a visit to the boyfriend's father's house, we met once more with the delightful J, boyfriend's father's girlfriend (sorted that out in your head?  Good-o.)  Supper was being made, and as most men of his age will bf's dad had a whole host of things in his cupboard that he had never eaten, and couldn't remember ever liking, let alone buying.  J on the other hand was delighted to discover a tin of Bird's Custard, which she prepared with relish and set upon the table at pudding as though expecting a prize.

I would have given her that prize.  I used to have Bird's for breakfast as a toddler, and mum despite knowing how could never really be bothered to make 'real' custard after bothering to make a crumble (understandably).  This was the very stuff of puddings, and I devoured it greedily.  The boys on the other hand could hardly believe their eyes - someone actually liked this stuff?  Were they suffering from something?  

It's all about the nostalgia.  It's easy to be snobbish about the sort of cheapy, tinned delights that one habitually gives children; I would rather eat 'real' custard than Bird's most of the time myself; I would rather eat the superb lentejas or lentil and chorizo stew served at a tapas restaurant than Heinz's finest.  Usually.  But on a cold Wednesday, unemployed, alone in the house, more than a little sorry for myself, what better way to invoke happier times than a bowl of baked beans, hotted up in the old pan with the (possibly even older) wooden spoon, a splash of malt vinegar (that's garnish, that is) and a cup of insanely weak tea?  A true madeline moment.

I say it's easy to be snobbish knowing full well that I am as bad as the boyfriend.  Mum once tried to get us to eat Fray Bento's tinned pies, and my god they smelt of cat food.  Many more leftovers for her than usual.  But I'm sure that a significant proportion of those who buy those pies now are not thinking, 'my a tinned pie how convenient' but rather, 'I used to have those when I came home from school and sat in front of those terrible cartoons.  It's a wonder they still make them.  I wonder if they still taste as nice,' and buy three.

Any memories of your own?  Please leave them in the comments, and we can all decide whether you've been blinded by nostalgia or rediscovered a culinary gem ;)

Sunday 14 November 2010

Patchwork Part 2: Grandmother's Flower Garden


Last post, I told you how to make the basic hexagons which make up a traditional piece of patchwork.  of course you could make squares, or indeed any polygonal shape, or combine different shapes - as long as the results will tessellate.  Hexagons however have something elegant and professional-looking about them, and arranged into 'flowers' as you can see in the above picture make for beautifully organic designs.

'Grandmother's Flower Garden' is the name of the pattern being created above, but I don't have enough white or other single-colour fabric to form the edges of my flowers, so instead I'm just going to sew together the seven-hex shapes you can see on the right - just as Mum did for my quilt-cover.

Making 'Flowers'
You will need:
7 hexes, either different colours or 1 of one, 6 of another
Cotton thread in a complimentary colour for both kinds of hex (e.g. black and rust hexes, brown thread)
needle, obv

BEFORE YOU START: Remember the Rules of Sewing - never use a thread longer than your own arm, and don't panic if you get loops - they can be prevented by letting your needle dangle freely on the thread occasionally.

Hooray for the return of shoddy MS Paint diagrams!

1. Lay out your hexes as you would wish them to appear, right-side up.  This is important when dealing with some patterns and stripes (see fig. 6.)
2.  Taking the central hex, position the edge of your first outer hex against it and flip it down so that the right-sides (outsides if you were wearing it) are facing each other, with the seam you are about to sew uppermost.  Right sides, remember!
3.  Sew right-to-left along this edge.  Don't worry about the papers and tacking stitches, we'll deal with that when it's all finished.  Use the stitches shown in these videos.
4. The tricky bit.  Consulting your layout and the right-side of your work if necessary, position the next outer hex alongside the first one.  Sew the dotted blue line, where the solid blue line is the seam you've already completed.  Tie off.
5.  Rotate the work.  Repeat Fig. 3 for the second outer hex, and then add the third by sewing a 'radial' seam as in Fig. 4.  Continue until you come to the last radial seam, which will be the other side of the first hex you added.
6.  Especially with stripes you can create a nice symmetrical effect.  I find it easiest to do my seams in the order described, because it feels like it involves less tying-off and on again than my mother's method:

1. Attach all outer hexes to the inner hex in a continuous seam.
2. Complete all the radial seams in turn.

If you find the second one easier, then it all averages out in the end; the Mum way is probably easier for stripe-co-ordination for beginners.

Soon - the coat pattern!

Wednesday 10 November 2010

Patchwork


I am the proud owner of a patchwork quilt-cover made by my mother.  Patchwork nowadays is a very old-fashioned hobby; it dates from the time when leftover fabric was a real resource to be saved, and when women needed things to do which were repetitive and occupied the creative parts of their brains to stop them from thinking things like 'perhaps I could leave the kitchen one day' and 'wouldn't it be nice to vote.'

Luckily for me English patchwork has never quite died, and now I can see the pattern of my early childhood laid out on my bed - from the silk and cotton shirts which Mum used to wear, to the stripy red and white of my primary school summer dresses, to the lining from Dad's old favourite coat.  I have also been left a hexagon template for making my own pieces, and seeing as I am now unemployed and lazing about the house with nothing to do, I have decided to create a patchwork housecoat - giving me something to do and a warm garment to laze about in.  I'll post the method or pattern for that when I get to that stage, but at the moment I'm still making hexagons, so I'll show you how to do that.

Making Hexagons
You Will Need:
Stiff paper or very thin card
Scissors for paper
Scissors for cloth (if you use the same scissors then they will become blunted and useless)
Bits of old dressmaking fabric, torn clothes, grown-out-of clothes (explore handing-me-down first)
Cotton thread in a bright colour
Plastic bag for scraps which inevitably result
Template

The last item is the most difficult to get hold of; every piece you make must have every side the same length to within about 2mm, so use a proper template such as can be printed off from here.  Using this template, cut out paper hexagons; you may be able to print the lines directly onto your paper.  I used my mother's metal hexagon as a stencil.

Cut out squares from your fabric pieces using your sewing scissors, so that there will be at least 1cm of seam allowance around your paper hexagons.  If you're cutting up a garment, cut swaths out from between the seams first, i.e. each side of a shirt as you would iron it, or opening out the legs of trousers; folding seams around the paper is awkward and makes for uneven hexes.  You could save or bin the resulting seamy scraps; if you saved them you'd be making a peg-rug, but I don't know how to do that and think that peg-rugs look like the seaweed mats which form in the oceans, so I binned them with joy.

Lay the paper hex on the wrong side of the cloth (the wrong side would be the 'inside' if you were wearing it) and fold  the fabric around the corners.  Using a single stitch at each corner, 'tack' the fabric to the paper as shown in these videos.  Leave an inch of thread tailing off the last stitch, cut the thread and begin another hex. Stack hexes by colour so that you know how many of each you have.

Once you've made all your hexagons you can decide how you want to sew them together.  Depending upon your commitment and level of extroversion, you can combine contrasting or complementary colours either in single hexes next to each other or as 'flowers' like the picture.  I went for the flower option, and I'll explain how to make those in my next post.

Saturday 6 November 2010

The Kitchen Clear-Out Before the Builders Come...

A 'do' rather than a 'make' this time, as being ovenless and with a bedroom full of boxes I find myself cramped for ovens or space to create cake or needle-based joys.  But I do have some advice for anyone who might be going through or go through such an upheaval as we are enduring here at the flat.

If you have a permissive parent, it is remarkably simple to appropriate items from the dusty bottoms (ahem) of kitchen cupboards and begin building your own kitchen - what used to be called the 'bottom drawer,' I believe.  What is simple, but not easy, to do is to decide which pieces of culinary ballast to jettison, and which may be useful at some future date (which is of course how they stayed in the cupboards in the first place).

How many bottle openers does one household need?  Will we ever use that fondue set, or the potato mouli? (Google it if you've never experienced this object, it is truly a thing of beauty and went into my 'bottom drawer.') What does this thing do?  If we find out what it is for, will we realise how much it could have been improving our lives all these years?  How 'best' is 'best' china if it is literally never used?  Which of these teacups have true emotional significance? (If you doubt that such a thing as a teacup can have emotional significance, then you are either my boyfriend or a similar non-hot-brown-stuff-imbiber, and a philistine).  

There is only one way - Keep, Move, Charity Shop, Bin.  Doubles of anything other than crockery, cutlery and wooden spoons etc. are out.  'Devices' are out.  If it has not even been seen in two years, it is subject to immediate tribunal to establish its status as 'for best' or 'shit.'  At the end of the day, as a student I managed to cook perfectly acceptable meals for 20 using only my slow cooker,  a single wooden spoon, chopping board, 2 sharp knives and a selection of cutlery swiped from parental drawers.  The event was 'BYOB - Bring Your Own Bowl' but the principle stands.  If such poverty and such plenty can coincide, then you should have no qualms about saying goodbye to that grapefruit knife, those can openers which don't work and the matching set of olive-skewers.

But leave me the potato mouli.