Pages

Showing posts with label pudding. Show all posts

Thursday, 20 December 2012

Chocolate truffles


Don't they look deliciously precious?

This Christmas, as I had a few people who I owed a present and like but don't know intimately well, I decided to make my own chocolate truffles.  They're just personal enough, being home-made, not to offend if people get the same thing as each other in public; and just impersonal enough to work for almost anybody. 

Having said that, I chose the flavours carefully so that there would be a variety in every little package, and people wouldn't feel unable to eat any of their packet.

The wrappings were made from some cellophane I stole from work, and tied with the ribbons on some ordinary gift tags.  The truffles were shaped by pouring the liquid ganaches into silicone ice-cube trays.  These are becoming more common, and do make the job infinitely easier, but if you don't have one, no worries.  Allow the ganache to set in the fridge until firm, then scoop out teaspoonfuls and roll them into balls in your hands.  This is messy but fun.

Truffles in the mould


ProTip: Keep two saucepans out, one for heating cream, the other with hot water.  If your hot cream isn't enough to melt the chocolate by iteslf, place the mixing bowl over the pan of hot water and stir the ganache rapidly until it begins to loosen and melt at the bottom.  Take the pan off the heat and continue stirring vigorously until the ganache is smooth.  DO NOT overheat, or the choc will split and become a bitter, oily mess.

Chocolate Truffles (makes 10-20)
You Will Need for every flavour: Moulding trays (ideally), chopping board and knife, several small bowls, many teaspoons, small saucepans, measuring jug (minimum mark 50ml), spatula or wooden spoon.  To wrap: nice paper, ribbon or tags, scissors.

Cherry Brandy Truffles
100g dark chocolate
50ml double cream
25ml cherry brandy
glacé cherries, dark, halved
cocoa powder

1) Chop the chocolate as finely as you can - this will make mixing it easier.  Place in a small bowl.
2) Heat the cream until not quite boiling; add the liqueur.  Pour the hot liquid over the chocolate.
3) Stir the cream and chocolate together until completely melted and blended.
4) Chop the cherries until you have as many halves as you want truffles.
5) Half-fill your moulds*, add a cherry-half flat-side up, and top off with more chocolate.
6) Chill for at least half an hour in the freezer, 2 hours in the fridge.  Scatter a little cocoa in another bowl.  Turn the chocs out of the moulds into the bowl of cocoa, and shuffle about until lightly coated.

*this recipe is difficult without moulds, but you could give it a go - forming balls in your hands around half-cherries.  They will end up bigger and rougher.
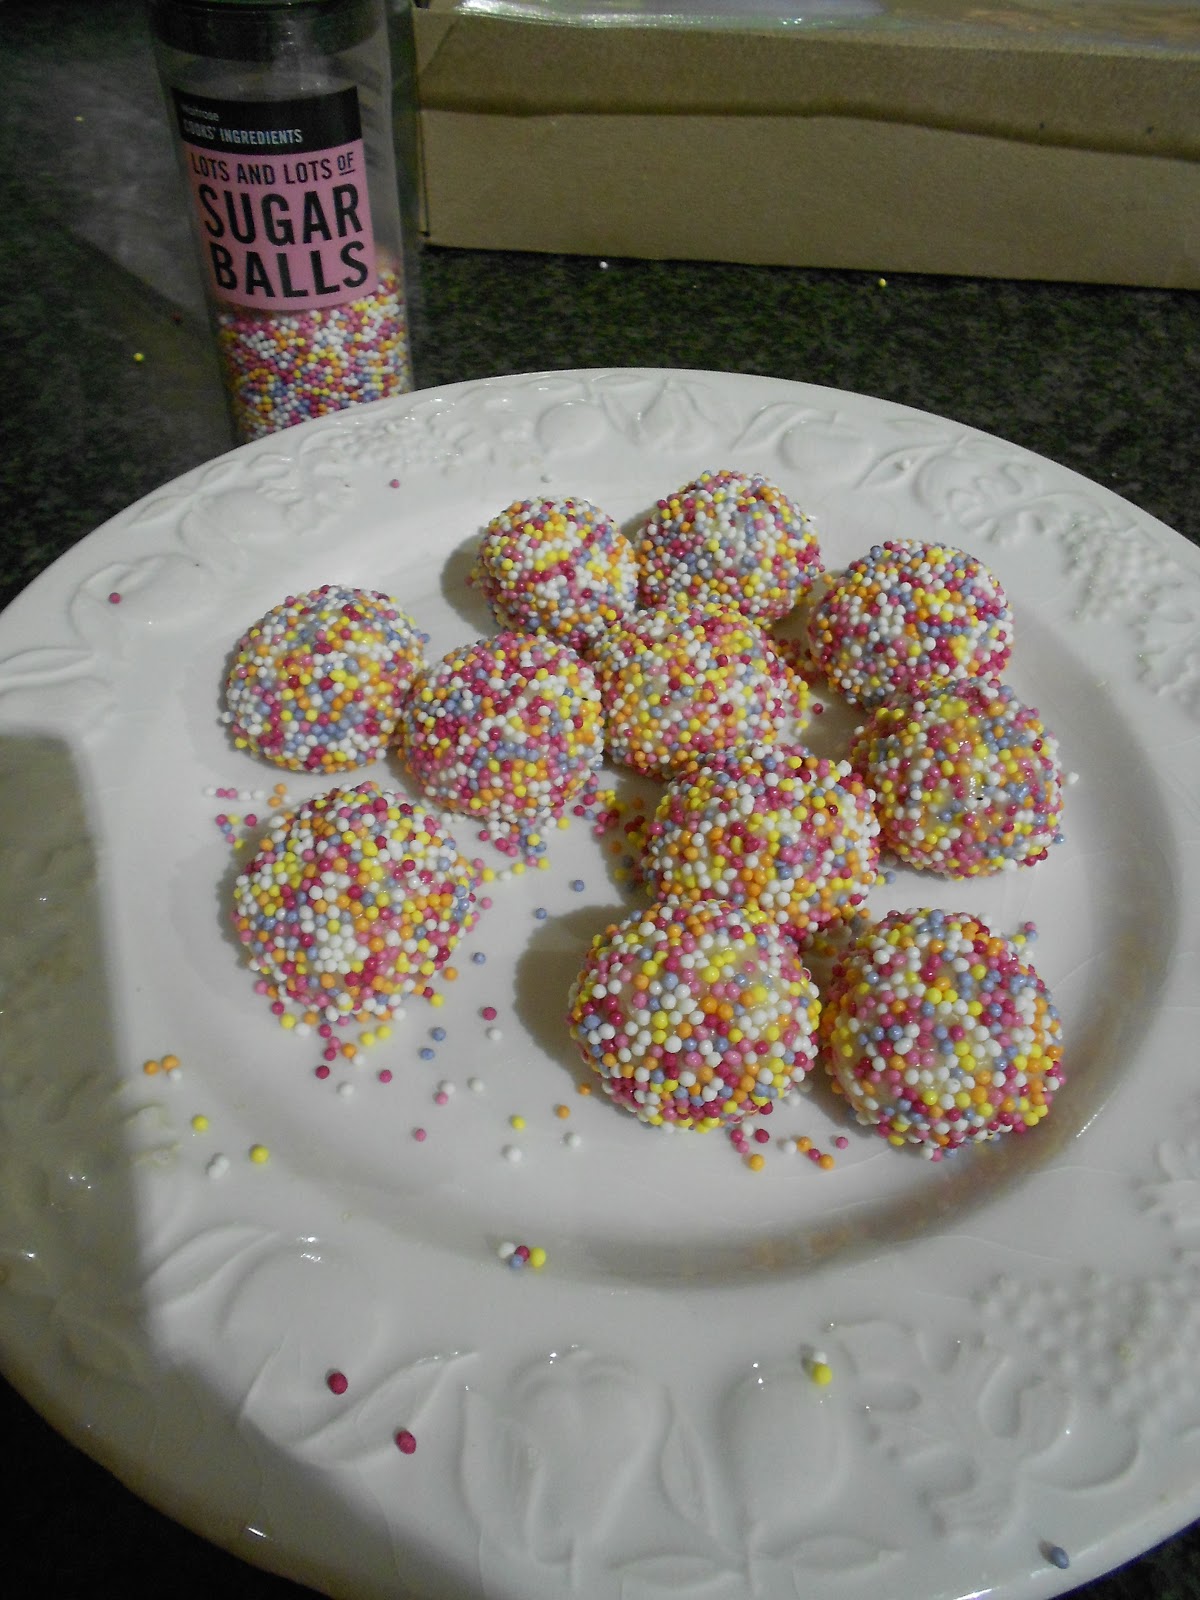
Twinkly White Vanilla Truffles
100g white chocolate
30ml double cream
1tsp vanilla essence
decorative sugar balls/sprinkles

1) Repeat steps 1-3 from the first recipe, substituting the tsp of vanilla for liqueur.
2) Freeze the ganache for half an hour, until just firm.  Scoop into balls with teaspoons and mould in your hands.  You washed your hands, right?
3) Scatter sugar balls into a bowl.  Turn out truffles into the bowl and roll in the decoration. 

N.B. White chocolate gets its distinctive colour from containing almost no cocoa solids.  This means that it melts more easily and needs less cream to make a satisfying ganache.

Trebor Extra Strong Snowballs
You Will Need: Pestle and mortar
100g dark chocolate
50ml double cream
3-4 Trebor Extra Strong Mints

1) Make the ganache as for Cherry Truffles, witholding the liqueur.
2) Pour into moulds and freeze for half an hour to set.
3) Crush 3-4 mints to fine dust in a pestle and mortar; roll the truffles in the dust until coated.

Coffee Truffles
You Will Need: sieve
100g dark chocolate
70ml double cream
1 tablespoon fine ground coffee


1) Chop 100g of the chocolate finely.  Put in a small bowl to mix.
2) Heat the cream with the coffee granules gently, stirring, for a while to allow the coffee to infuse.
3) When the cream is hot and coloured, pour it onto the chocolate through the sieve.  You don't want grit in your chocs.  Stir until the choc and cream are well blended.  Not all of the cream will come through the sieve.
4) Pour the ganache into moulds and chill until firm, or chill and roll into balls.

To Present
A square of cellophane or paper 8ins on each side will just envelop eight truffles comfortably.  

Friday, 5 October 2012

Fig Upside-Down Cake

I made this cake on the fly as a thank-you present for lots of people.  It needed to be rich and square so that everyone could take a small piece which would satisfy them and not spoil the shape of the cake.  I think it would make a lovely low-key Christmas cake for those who are not big on the traditional version.

Fig Upside-Down Cake
You Will Need: 20cm square cake tin, scissors and greaseproof paper, scales, large bowl, small bowl, teaspoon, kettle, chopping board and knife, sieve, wooden spoon, dinner knife, lemon zester or grater, rolling pin, cooling rack, serving dish.

4 ripe figs
40g hazelnuts
8oz soft butter
6 1/2 oz caster sugar
3tsp honey
12 fresh dates
2 large handfuls of sultanas
2 Lady Grey teabags
4 eggs
zest one orange
8oz self-raising flour
100g golden marzipan

1) Preheat the oven to 180 degrees C.  Grease the bottom of your tin. Cut two long slices of greaseproof paper, and cross them in the bottom of the tin.
2) Cut the stalks off your figs.  Slice them into 3mm slices.  Use to line the bottom of your tin in a symmetrical pattern.  Scatter hazelnuts into the gaps between the fig slices.
3) Chop the dates, removing the stones.  Put them in a bowl with the sultanas and teabags; add just enough boiling water to cover them.  Allow to steep.
4) Cream the butter, honey and sugar in the large bowl.  Add one egg at a time, beating in well, followed by some of the flour, then the next egg.  Beat to a smooth mixture.  Zest the orange and stir in the zest.
5) Drain the fruits in the sieve and add the dry fruits to the mixture.  Mix gently.  Spoon half of this mixture into the tin, being careful not to spoil the fig pattern.
6) Roll out the block of marzipan into a square, about 2mm thick and smaller than your tin.  Place on top of the mix in the tin, then pour the rest of the mix on top.  Level the mixture.
7) Bake for about 40+ minutes, if necessary with a tinfoil hat on to prevent browning.
8) Cool for a long time in the tin before turning out, first to the cooling rack and then sliding onto the final plate.

Monday, 17 September 2012

Decadent Pear and Chocolate Birthday Cake


A little while ago I mentioned this cake, and this one which I made in response.  My good friend made a beautiful-looking pear and dark chocolate version, although much like me she struggled with unripe fruit and getting the curd to set.  I was sorry I didn't get to taste it, as it has really inspired my second try.
I really wanted to get this right.  It is high time I had a proper show-stopping torte on my resumĂ© which I can whip out for other people's birthdays as well as my own.  This time I made sure to buy my pears a week in advance, so that they would be juicy and flavoursome by the time it came to making the cake.  Thankfully, it is by far the best cake I have ever made!

This is an expensive confection as it involves buying hazelnuts (peeled nuts are a luxury in this country for shame) and a bottle of decent sweet wine.  Thankfully fruit and chocolate are both cheap!  It is also a multi-stage bastard.  As I have said, usually I avoid multi-stage anything like the plague, being of the 'screw it we'll have stew' school of culinary excellence, but for one's birthday as a known baker one has to go the extra mile.

One benefit of these sorts of cakes is that almost any of the stages stands alone.  The praline is a great peanut brittle substitute, the cake is obviously pleasant, the poached pears are a great pudding in and of themselves and the ganache could be used to make truffles.  If you've been paying attention, you'll realise that I made all of these things one at a time over the past few days, to avoid a nine-hour baking binge on the night of the party.

For shopping lists: Total chocolate used overall 500g, total cream used overall 300ml, total hazelnuts 400g

Spiced Pear and Chocolate Cake with Indulgent Pears and Hazelnut Praline

You Will Need:
Hazelnut Praline, one batch - three decorative pieces, the rest powdered
Chocolate Ganache, one batch
Pears Poached in Sweet Wine, - 4 pears' worth including three pear fans to decorate
100g hazelnuts, to decorate

Spiced Pear And Chocolate Cakes
You Will Need: scales, 2 tins, greaseproof paper, wooden spoon, large bowl, chopping board and knife, (small grater),potato peeler, teaspoon, whisk, 2 medium bowls, cup, small saucepan, cooling rack

100g chocolate
200g butter
200g sugar
5 eggs
2 small pears
1/2tsp nutmeg, or 1/2 a nutmeg grated
1/2tsp cinnamon
100g hazelnuts
200g self-raising flour

1) Preheat the oven to 180degC.  Line and grease your tins.
2) Peel, core and chop the pears into small pieces.
3) Separate your eggs, with the whites going into one medium bowl and the yolks a cup.  Cut the butter into small pieces, and break up the chocolate.  Set the second medium bowl over a pan of boiling water, and melt the chocolate, sugar and butter together.  When the mixture is all mixed with no lumps, transfer to the large bowl and whisk in the egg yolks gradually.
4) Grind the hazelnuts, and mix with the flour and spices on the scales.  Wash the whisk; whisk the egg whites to soft-peak stage; fold spoonfuls into the mixture alternately with flour, whisking the whites back up to peaks again between spoonfuls.
5) Pour equally into the tins and bake 30-35 minutes, until risen and clean-skewer.
6) Allow the cakes to cool in the tins for 10 minutes.  Remove from the tins and allow to cool on a rack.

Assembly
You Will Need: Serving dish, breadboard, breadknife, spoon, medium bowl, small bowl, small saucepan, teaspoons, dinner knife

200ml thick cream
200g dark chocolate

1) Allow your ganache to come back to room temperature so that you can work with it.
2) Cut your cakes.  Very gently turn out the first cake onto the serving dish.  Now cut it in two carefully, and shuffle the top half onto the breadboard. 
3) Spread a thick ring of ganache all the way around the edge of the cake on the serving dish, using your teaspoons and dinnerknife to manipulate it.
4) Mix the hazelnut praline powder powder gently with the thick cream only until mixed.  Spoon a round of this mixture inside the ganache ring.  Top with the next round of cake.
5) Turn out the second cake onto the breadboard and cut it in two.
5) For the central filling layer, arrange the poached pear slices in an overlapping layer.  Top with a third round of cake.
6) Use the remaining ganache and hazelnut cream to fill the third round, as before.  Top with the final cake.
7) Melt the last chocolate in the small bowl over the small pan.  Pour this melted chocolate all over the cake, first spreading a layer to catch all the crumbs, then allowing it to dribble over the sides organically.  Allow to cool slightly.  Fan out the poached pear halves in a trio; wedge the chunks of praline in between the pears.  Place hazelnuts evenly around the edge to mark portion sizes.

Fin! Serve to no fewer than a dozen people at once!


Pears Poached In Sweet Wine


This pudding is one of my father's favourites, from the worst-laid-out cookbook either of us has ever seen, authored by Nigel Slater, one of my favourite food people.  This isn't Nigel's recipe, because it uses sweet wine instead of red, but red is traditional.
It is a law of cooking that if (as generally recommended) you save the sh*te wine for cooking, your cooking will taste of sh*te wine.  Splash out on the £6.99 stuff on offer from £10 - you can always drink the rest of the bottle.

Pears Poached In Sweet Wine
You Will Need: Medium saucepan, measuring jug, wooden spoon, teaspoon, chopping board and knife, potato peeler, plate

4 small pears
350ml good sweet wine such as Muscat
30g sugar
100ml water
1/2 tsp cinnamon
1 vanilla pod, split and scraped
6 cloves

1) Peel and cut the pears into halves lengthways, scooping out the cores with the end of the teaspoon.
1a) If making my pear and chocolate birthday cake, make sure that you keep three half-pears with stalks on to make into decorative fans for the top.  Peel and core these too.
2) Melt the sugar in the water in the saucepan.  Split the vanilla pod. Scrape the vanilla seeds with the end of your knife into the pan; add the other spices including the pod, and swirl until golden and fragrant.  Add the wine carefully. (Method from Jamie Oliver).  Bring the mixture to a simmer, and add the pears.  Cook for approximately half an hour, until tender.
3) Retrieve the pears with the spoon.
3a) If you are making the pear and chocolate birthday cake, cut all but three half-pears into long slices for a filling layer.  Carefully cut the stalked three into fans, and keep these aside.


Protip: Save the cooking liquid as a hot toddy - it tastes AWESOME.  Cook's perks!  Or reduce slightly and serve as a sauce for the pears, if doing as a pudding.

Chocolate Ganache


Chocolate Ganache
You Will Need: Small saucepan, wooden spoon, medium bowl, scales, measuing jug, chopping board and sharp knife, clingfilm

100ml extra thick cream
200g dark chocolate

1) Break the chocolate into small pieces and chop as small as you can.  Pour these chips into the bowl.
2) Heat the cream until hot but not boiling.  Pour swiftly over the chocolate, and stir rapidly until all of the chocolate is melted.  If the cream becomes too cool, heat the ganache very gently again over a pan of hot water.
3) When mixed, cover the ganache with clingfilm, and allow to cool back to room temperature.  Chill in the fridge.
4) To make truffles, cover your hands in cocoa powder, take teaspoonfuls of room-temperature ganache, roll into balls and then roll in cocoa, chopped nuts or other flavourings.  Ganache can also be piped as a decoration or filling.

Saturday, 8 September 2012

Hazelnut Praline


This. Stuff.  Smells.  AMAZEBALLS.  If you like hazelnuts (and who doesn't?) this is the best way I have ever experienced of getting a proper fragrant waft of them right in your face, covered in sugar.
Use a decent-sized saucepan, to make the change in the colour of the sugar easier to detect.  I burnt one batch because I turned my back on it to grease my baking tray, in the erroneous belief that it would take ages.  This is reflected in the instructions.  Watch your sugar very carefully.

Hazelnut Praline
You Will Need: Baking tray, greaseproof paper, scales, saucepan, wooden spoon, spoon (food processor)

Dissolved sugar, just beginning to colour
butter smudge
200g hazelnuts
200g sugar
100ml water

1) Line a baking tray with greaseproof paper, and grease the paper with butter.
Getting towards to that golden colour that you want
2) Heat 100g of the sugar and 50ml water in the saucepan.  Let the sugar dissolve, and then let it cook on a medium-high heat without stirring it at all for a while until a golden colour.  DO NOT SUCCUMB to the stirring monster.  If the sugar gets too dark it is burnt; throw it away and start again (use boiling water from a kettle to clean sugary pans).
3) When the sugar is golden, pour in the hazelnuts, and coat them in the sugar as well as possible.  Pour the mixture out onto the baking tray, and spread it out into a single layer using the back of a metal spoon.  Leave to cool.
4) Meanwhile, clean the pan; make another batch of caramel with the remaining sugar and water, and pour over the hazelnuts to fill in the gaps.  Leave to cool.
5) When cool, peel the brittle off the greaseproof paper.  You now have different things you can do with it:

  • Coat or drizzle with chocolate and break into pieces for a decadent sweetie/candy present.
  • Break into pieces to use as cake decoration.  If making my pear-and-chocolate birthday cake, break off three large pieces for this purpose.
  • Smash into small pieces and blend in the food processor until the texture of sand.  This can then be added to other ingredients to make homemade Nutella OR, if making my birthday cake, saved to mix with cream to make a pipe-able hazelnut filling.

SO TASTY

Birthday ingredients: left, decorative chunks; right, praline powder


Saturday, 1 September 2012

Toffee Banana Crackle Trifles


Crap!  Dinner party in half an hour, haven't bought ingredients yet!  Smooth organising there E!
-Buy bananas, pasta stuff, peas (for soup).
-Make soup.  Cook half the pasta things, get pan of hot water going.  Toast porridge oats (bear with me).
-eat soup.  Finish my soup first, leave others chatting, finish pasta things.
-Eat pasta.  Finish my pasta first, start making pudding.

This is a super-easy, foolproof (if you time it right) good-looking pudding with minimum Faff Index (I would say a Faff of 4/10, because other than watching a grill (bear with me) it has absolutely no difficult steps) - which is perfect for small or large dinner gatherings.  They went down a storm, with only one complaint/suggestion from the Man which I have incorporated here.  This was lucky as I spent some of the evening going OMG why did I agree to make nice food at 5 minutes notice per course I am an idiot, and having a successful, bloggable pudding makes me feel worthy and nice again :)

Toffee Banana Crackle Triflets (Serves 4 +)
You Will Need: serving bowls; chopping board and sharp knife; baking tray; two teaspoons; small saucepan.

Number of bananas equal to number of people who deserve them
Extra thick double cream OR vanilla / nutty icecream
porridge oats
walnuts
caster sugar
butter

1) Scatter the porridge oats on the baking tray, and toast them under the grill until branflake coloured and fragrant, about 4 minutes.  Allow the tray to cool.
2) Cut the bananas into narrow diagonal pieces and arrange the pieces in the bowls, one nana per person.
3) Dollop cream or icecream on the nanas.
4) Scatter porridge oats on the cream to give a good scatty coating.  Chop the walnuts not too finely and scatter these too.
5) In the small pan, heat about a heaped dessertspoonful of caster sugar per person and a *tiny* slither of butter over a high heat, until the sugar has completely melted and is a rich dark brown.
6) Using your clean teaspoon, drizzle the toffee crackling over the puddings.  Listen to the crackly noise!  Try to avoid getting the crackle on the sides of the bowls as it will dry on and be harder to get off.

ProTip: When washing up toffee apparatus, boil a kettle and use to rinse / soften baked on sugar, and scrape at it with wooden implements.  Don't try to pick at it with your fingernails or other apparatus it will just break things and you.

Sunday, 26 August 2012

No-Scales Easy Chocolate And Banana Cake


Leftover bananas.  There are always some, at least one little black bastard sitting there getting smelly and ripening all your other fruit.  What to do with them?  My mother used to make milkshakes with vanilla icecream; the mother-out-law makes smoothies (which I can't stand); I make cake.  I do have a 'banana bread' recipe somewhere, but this stodgy wonder is a good'un for pudding.  It's also mostly banana, which is kind of the point.

I usually despise Americans for measuring things by volume, but in this case it's just too easy.

Easy Banana and Chocolate Cake

You Will Need: Chopping board and knife; dessertspoon; large bowl; wooden spoon; small bowl; fork; 8 inch circular tin
3 bananas
1/2 bar dark chocolate
large handful walnuts
1 egg
4 dessertspoonfuls walnut/groundnut/vegetable oil
3 rounded dessertspoonfuls brown sugar
3 heaped dessertspoonfuls self-raising flour

1) Preheat the oven and grease the tin.  Chop the bananas, chocolate and walnuts into small chunks, and mix in the large bowl.
2) Add the sugar.  Beat the egg and add to the bowl; add the oil.  Mix well until gloopy.
3) Heap out desserspoonfuls of flour one at a time, mixing as you go.  Add a little more if the mix looks too runny; you should be able to pull a clean track through the mix with your spoon and it should look pretty sticky.
4) Pour into the tin and bake for 25-30 minutes until a skewer comes out clean and the top is golden brown.  Look out for skewering choccy chunks as they will give a false negative.  Cool, turn out and cool some more.

5) Om nom nom!


Monday, 13 August 2012

White Chocolate Nectarine Cake

I don't usually make cakes like this.  I usually despair of the faff of multiple-stage, gooey, sugar-heating concoctions with complicated fillings.  They go against all my principles.  They are (I believe) really no tastier than simple ones.  And yet, when a friend approached me with this recipe, and I said 'i'm not making this, see above also I hate mango,' she was able to persuade me to do an Elisabeth-friendly version.  It uses proper British measures by weight (not those blasted 'cups'), nectarines (one of my favourite fruits) and white chocolate.  It went down a storm at the girly baking day yesterday, and I'm already thinking up ways to improve it and riff on it to use as a birthday cake in a few weeks' time. You will notice that much of the equipment for this cake overlaps in the different stages, so don't be afraid to wash up as you go along.

Stupidly Complex Squidgy Ginger, White Chocolate And Nectarine Toffee Cake

Nectarine Curd
You Will Need: sharp knife, chopping board, small saucepan, blender, sieve, cup, two small bowls, wooden spoon
11oz ripe nectarines, stoned (about three; also you will need one or so for decorating later)
2 egg yolks
6 oz sugar
2 oz butter
1) De-stone the nectarines by cutting all the way around them and twisting gently on each half.  Chop them into small pieces.  Put them in the saucepan with a splash of water, and simmer until disintegrating.  Blend the mixture to a smooth puree, and keep aside in a small bowl or the blender compartment.
2) In a clean saucepan, heat a little water and set another small bowl above it.  Melt the butter in the bowl.  Separate each egg with the whites going into a cup and the yolks into the butter.  Add the sugar to the butter and eggs, and mix well over a gentle heat.  Add the puree.
3) Cook for about half an hour or until the mixture coats the back of the spoon.  If too runny, add another egg yolk.  Strain the mixture through the sieve, forcing it through with the spoon, into a bowl.  Discard any fruity bits which can't go through the sieve, and set the curd in the fridge to cool fully.

Cake
You Will Need: Tin 23cm across, baking paper, scissors, scales, large bowl, wooden spoon, small bowl, strong whisk, spatula, skewer, cooling rack, two plates, breadknife
3 eggs
8oz butter (Kerry Gold)
6oz sugar
8oz self raising flour
4tsp ground ginger
1) Preheat the oven to 180degrees C.  Line and grease the tin.
2) In the large bowl, cream the butter and sugar.  Separate the eggs, with the yolks going into the big bowl and the whites a small one.  Mix in the egg yolks; add the flour and ginger a little at a time.
3) Whisk the eggwhites to soft peaks in the small bowl, and carefully fold them into the cake mix until it is runny enough to use the whisk.  Whisk the mixture together, and pour into the tin.  Smooth down the surface of the mixture, leaving a dent in the middle to encourage a flat cake.
4) Bake approximately 45 minutes, or to clean-skewer.  Remove when done to a cooling rack, and turn out.
5) Leave to cool for a good while.  Turn right-side up and trim off the domed top of the cake.  Eat this later.  Put the remaining cake on a plate; carefully saw through it to make two layers with the  breadknife and shuffle the top half onto the second plate.  Leave to cool completely (I had to set a 15-minute timer and use peer pressure to stop me fiddling with it.)

Candied nectarines
You Will Need: sharp knife, chopping board, small pan, tray, greaseproof paper, small plate, wooden skewers, wooden spoon, kettle
1 1/2 nectarines
4 tablespoons caster sugar
2 tablespoons chunky brown sugar
1) Slice the nectarines.  Line the tray with greaseproof paper.
2) Heat the caster sugar in a clean, dry, small saucepan until melted and golden-brown.  Meanwhile put the chunky-grained brown sugar on the small plate.
3) Coat each slice in toffee, then turn it out first into the chunky sugar, and then onto the tray.  Leave to cool.
4) Boil the kettle and pour into the toffee pan to get the crusted sugar off easily.  Then wash up as normal.

Ganache
You Will Need: chopping board; sharp knife; bowl; small pan; measuring jug, spoon
400g white chocolate
200ml cream
1) Measure out 200ml of cream, and heat it very gently in the pan without boiling it.
2) Chop the white chocolate into very small pieces, and put in a bowl.  Pour the hot cream over the chocolate and stir gently until the ganache is smooth.  If the cream cools too quickly to get rid of all the lumps, heat the ganache over a pan of hot water on the hob, stirring all the time until smooth.


Assembly
You Will Need: Small plastic sandwich bag, scissors, spoon, knife, cake components
1) Gather everything you need.  Spread the sandwich bag securely open, and spoon some of the white chocolate ganache into it.  Squeeze all of the mixture into one corner of the bag, and cut a little corner off with the scissors.  Pipe a wide spiral of ganache all around the lower half of the cake.


2) Fill the gaps around the spiral with the nectarine curd.  Any left over will keep in a jar in the fridge for 3 weeks.
3) Lift the top cake onto the bottom cake.  Spread the remaining ganache over the cake, letting it drip down the sides.  Decorate with the candy slices.  (n.b. version pictured used half as much ganache, but I doubled it in the blog recipe so that your crusts would be covered.)

4) Eat, eat, enjoy!

Tuesday, 19 June 2012

Victoria and Albert Sponge (and edible flags)

what a pavlova (oh, pun!) Note pink lemonade to right, very appropriate
I love rice paper.  You don't seem to get it in the supermarkets anymore, so I ordered a huge amount off the internet.  Once I'd got out an A4 sheet it seemed a shame not to use it all, so I went on a bit of an edible flag binge this month.  Still - the Queen is only the Queen for the 60th year running once...

The 'Albert' in this otherwise typical sponge comes from the German-themed grated apple and cinnamon in the mixture.  This does cause it to densen dramatically but I got no complaints as to taste.  Next time perhaps more sophisticated fruit-layering could be arranged.

Victoria and Albert Sponge
You Will Need: 23cm cake tin, greaseproof paper, scissors, large bowl, wooden spoon, small bowl, teaspoon, scales, whisk, cheesegrater, veg peeler, chopping board and sharp knife, spoon, baking tray, breadknife, serving plate, plate, dinner knife (skewers / cocktail sticks, cotton bud or clean paintbrush)

6 eggs
self-raising flour
butter
sugar
2 Bramley apples
3 tsp cinnamon
red berry jam
1 punnet strawberries
250ml double cream
(rice paper, food colouring)

1) Preheat the oven to 180 C.  Line your tin with a circle of greaseproof paper and smear the sides with butter.
2) Weigh 4 of your eggs (reserve the other 2).  Weigh out and beat together 4 eggsworth of butter and sugar.  Beat the 4 eggs together in a small bowl; gradually add and mix them with the butter.
3) Peel the Bramleys and grate them into the mixture.  Mix.  Weigh out 4 eggsworth of flour, add the cinnamon, and gradually fold it into the mixture a little at a time.
4) Pour the mix into the caketin, and make a dent in the centre - then when the centre inevitably rises, your cake will be flatter overall.  Protip.  Bake approximately 45mins - 1 hour, with a tinfoil hat for the last 15 minutes if need be, to clean-skewer stage.
5) When your cake is done, take it out of the oven and whack the oven up to 200 C.  Hardcore.  Allow the cake to cool.  Clean your large bowl.  Separate your remaining two eggs, getting the whites into the large bowl.  Whisk your eggwhites until they are at stiff-peak stage - when you lift the whisk, the points that form should be rigid.  Beat in approximately 6 tablespoons of sugar one spoon at a time, until stiff and glossy.
6) Cut another circle of greaseproof paper the same size as your cake, and lay on a baking tray.  Spoon the meringue out over this circle to almost cover it, forming a 'nest'.  Bake at 200 C for 10 minutes, then turn the oven off.
7) Wait at least 2 hours.  Watch a film, play a game, make lunch, whatever.
8) De-tin your cake.  Place it on the serving plate.  Carefully saw the cake in half, and shift the top half onto a second plate.  De-oven your meringue nest.  Carefully transfer the meringue from the baking tray to the top cake-half, peeling off the greaseproof paper.  It will be quite soft and sticky.
9) Chop 2/3 of a punnet of strawberries, and whip all the cream to soft-peak stage (when the peaks wilt).  Spread jam on the lower half of the cake; follow with half the cream, and strawbs to cover.  Lift the top cake on.  Fill the nest with the rest of the cream, and decorate with the remaining strawbs, leaving small ones whole and un-hulled.
10) If flags desired: Tear a sheet of ricepaper into rectangles.  Make a shallow fold at one of the short ends; wet the edge of this fold and fold across a stick.  Press firmly to glue the paper together around the stick.  Paint designs on with food colouring.

Protip: Rice paper is edible, but not very tasty.  This fact was rediscovered multiple times, often by the same people twice.

Tuesday, 12 June 2012

Afternoon Tea Cakes

The other weekend, for the Jubilee, I hosted an afternoon tea party.  Some cakes were classic recipes I followed almost to the letter, and suggest you do the same; with others, I got a bit more creative.  When you're baking all day it's best not to strain the brain too hard.

Classic scones - I turned to the BBC's recipe here, for simplicity.  Breads and I have never really clicked, so I wanted firm guidance from Auntie.  Make scones on the day for freshness and warmth that will impress.


Palatial shortbread  - Millionaire's shortbread is fast becoming a family favourite, and you can find versions of it in hip coffee chains all over the country nowadays.  My version is slightly more decadent even than the Beeb's.  Following their recipe mostly, I added 2 teaspoons of ground cardamom to the shortbread mix (a combo I picked up from here years ago).
I did accidentally turn my back on the caramel resulting in a delicious fudge.  I left the butter out of the dark chocolate mixture, for depth of flavour, and instead of white chocolate decorated the tops when still tacky with silver balls.

Rhubarb tartlets - all my own work
You Will Need: fairycake tin with twelve holes, large bowl, scales, dinner knife, clingfilm, rolling pin, pastry cutter/glass, small pan, small bowl, cup, chopping board and sharp knife, wooden spoon, fork, teaspoon, baking tray
2oz cold butter
1oz ground almonds
1 tsp ground ginger
3oz plain flour
1-2 stems ripe red rhubarb
butter
2 eggs
double cream
caster sugar
jar of crystallised ginger

1) Make the pastry.  Cut the butter into little cubes.  Knead with the dry ingredients with your hands, first to breadcrumb stage and then squidging into a single ball.  Wrap in clingfilm and chill in the fridge for half an hour.
2) When the pastry is cold, preheat the oven to 180 C.  Roll the pastry out on a floury surface until 3-4mm thick.  Be aware that this pastry is very 'short' or flaky.  It will not like you!  Do not despair.  Cut circles out of the pastry and press them into the tin, squidging any cracks together with your fingers.  You should be able to make at least 6. I got 7.
3) Poke two sets of holes into the bottom of each pastry case with your fork, to allow any air bubbles trapped underneath to escape and not bugger them up.  Bake until golden brown, about 10 minutes.
4) Allow the cases to cool completely before touching them again.  If tempted, make more cake while waiting.
5) When the cases are cool, trim the ends off your rhubarb and pull out any stringy ribs from the square edges.  Chop it into 2-3cm pieces, and if they are fat, halve them lengthways.  Put 2-3 pieces of rhubarb per pastry case into a small pan with a knob of butter and a splash of water.  Fry/poach the rhubarb, adding a little more water as it evaporates, until the rhubarb is pink and tender and strings are coming off it.
6) Lift the pastry cases onto a sturdy baking tray and fill them with rhubarb.
7) Separate the eggs, with the yolks going into a small bowl and the whites a cup (save whites for meringue in the fridge).  Add a small pile of sugar.  Beat this together with a fork.  Gently heat enough double cream to cover the bottom of your small pan.  Add the eggmix and stir quickly to blend.  When blended, take off the heat and carefully spoon into the pastries, around the rhubarb.
8) Put back in the oven (hey I didn't say to turn it off) for another 7 minutes, to bake the custard and roast the tips of the rhubarb.  When out of the oven, drizzle some of the sugar syrup from a jar of crystallised ginger over the top of each one.  This makes all the difference.


Mini battenberg
This is a lovely recipe from the Hariy Bikers.  I only made one egg's worth of sponge, dividing my tin with their greaseproof paper trick into 3 - half for battenbergs, and one for my shortbread.  I also added lemon zest and a splash of juice to the 'yellow' Berg, and used 3 tsp of raspberry jam to colour the pink Berg as I couldn't find the mother-out-law's cochineal.

Tuesday, 5 June 2012

Afternoon Tea Sandwiches


Afternoon tea is a Great British Institution.  It is a Posh Thing.  It is something 'the Set' might have done 'properly' in the 17 and 1800s.  Messing it up is not done.

On the other hand, it is quite difficult to mess up afternoon tea.  There are only a few boxes to tick, and there are multiple acceptable ways to experiment with the content, theme and context of the event (cupcakes!  Steampunk! Picnics!  Booze!)  Here is what I reckon constitutes a 'proper' tea:

  • Teas, plural, available - preferably some to be served with milk (e.g. Assam) and some without (Lady Grey).
  • Scones, with real clotted cream, and at least two kinds of jam - a red/purple one and an orange one, minimum.
  • Cake - either individual chunks, such as Lamingtons, brownies, or other traybakes; or a single large and creamy edifice.
  • Finger Sandwiches.
    • Sandwiches must be able to be eaten in two bites or less.
    • They must have the crusts cut off, or it's not posh.
    • The shape of the eventual sandwich (triangle or rectangle) is immaterial.
    • Fillings may include spreads, but these must be savoury (not peanut butter).  
    • Faffless but uber-kitzch adornments such as cress should be rampant.
Of all the boxes, it is the sandwiches which are most often overlooked.  They do not make as photogenic an arrangement on the three-tiered stand as the cakes; it is the scones which are seen to be the true essentials, and 'tea and sandwiches' doesn't have the same ring.  Nevertheless afternoon tea is a Meal, a small meal but a Meal all the same, and all posh meals have multiple courses.  

The Approved Sandwich-Making Method (appropriated from Douglas Adams)
The chief among knives, of course, was the carving knife. This was the knife that would not merely impose its will on the medium through which it moved, as did the bread knife. It must work with it, be guided by the grain of the meat, to achieve slices of the most exquisite consistency and translucency, that would slide away in filmy folds from the main hunk of meat. The Sandwich Maker would then flip each sheet with a smooth flick of the wrist onto the beautifuly proportioned lower bread slice, trim it with four deft strokes and then at last perform the magic that the children of the village so longed to gather round and watch with rapt attention and wonder.  With just four more dexerous flips of the knife he would assemble the trimmings into a perfectly fitting jigsaw of pieces on top of the primary slice. For every sandwich the size and shape of the trimmings were different, but the Sandwich Maker would always effortlessly and without hesitation assemble them into a pattern which fitted perfectly. A second layer of meat and a second layer of trimmings, and the main act of creation would now be accomplished.


Suggested Flavours For Afternoon Tea Finger-Sandwiches

Meats
Roast beef / steak and mustard.
CurryNation Chicken: to make simple sauce, finely chop half an onion, fry in butter with 2tsp of cumin, coriander and a sprinkle of turmeric, and add coconut cream until spreadable.  Coat diced fried chicken in the mixture and assemble the sandwiches as above.
Fish
Smoked salmon, cream cheese and dill
Mackerel and horseradish
Veggie
Cucumber.  N.B. I could write a whole post on the Correct way to make cucumber sandwiches; the key thing is to peel the cucumber, slice thinly and drain the slices before assembly in a colander, scattered with salt.  This stops them going soggy.  Dress with salad dressing to increase flavour.
Cheese and chutney.