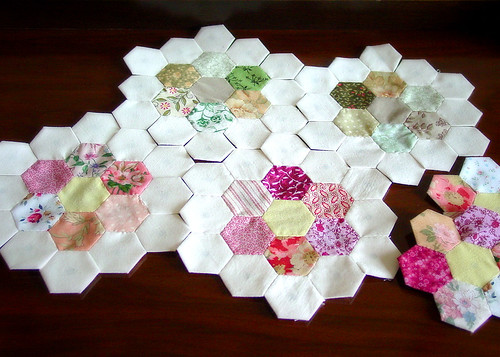
Last post, I told you how to make the basic hexagons which make up a traditional piece of patchwork. of course you could make squares, or indeed any polygonal shape, or combine different shapes - as long as the results will tessellate. Hexagons however have something elegant and professional-looking about them, and arranged into 'flowers' as you can see in the above picture make for beautifully organic designs.
'Grandmother's Flower Garden' is the name of the pattern being created above, but I don't have enough white or other single-colour fabric to form the edges of my flowers, so instead I'm just going to sew together the seven-hex shapes you can see on the right - just as Mum did for my quilt-cover.
Making 'Flowers'
You will need:
7 hexes, either different colours or 1 of one, 6 of another
Cotton thread in a complimentary colour for both kinds of hex (e.g. black and rust hexes, brown thread)
needle, obv
BEFORE YOU START: Remember the Rules of Sewing - never use a thread longer than your own arm, and don't panic if you get loops - they can be prevented by letting your needle dangle freely on the thread occasionally.

Hooray for the return of shoddy MS Paint diagrams!
2. Taking the central hex, position the edge of your first outer hex against it and flip it down so that the right-sides (outsides if you were wearing it) are facing each other, with the seam you are about to sew uppermost. Right sides, remember!
3. Sew right-to-left along this edge. Don't worry about the papers and tacking stitches, we'll deal with that when it's all finished. Use the stitches shown in these videos.
4. The tricky bit. Consulting your layout and the right-side of your work if necessary, position the next outer hex alongside the first one. Sew the dotted blue line, where the solid blue line is the seam you've already completed. Tie off.
5. Rotate the work. Repeat Fig. 3 for the second outer hex, and then add the third by sewing a 'radial' seam as in Fig. 4. Continue until you come to the last radial seam, which will be the other side of the first hex you added.
6. Especially with stripes you can create a nice symmetrical effect. I find it easiest to do my seams in the order described, because it feels like it involves less tying-off and on again than my mother's method:
1. Attach all outer hexes to the inner hex in a continuous seam.
2. Complete all the radial seams in turn.
If you find the second one easier, then it all averages out in the end; the Mum way is probably easier for stripe-co-ordination for beginners.
Soon - the coat pattern!
Very helpful! I had already created a pile of hexagon flower shapes, but the colours were too dark/heavy to look good in a solid mass. Now that I see an example with lighter shades attached in a frame around the central darker ones, I'm inspired to continue. Thank you!
ReplyDelete